

Contents — Jump to a section
Getting Started: Opening Your Seller Account
What it is: The path from the Sell page to your open shop. There are three steps, and they run in order without any detours: you pick a plan, you make your account, you pay. A short shop setup comes right after the payment. The whole thing takes about five minutes.
Before you start: Have a card ready. Every plan is billed monthly, apart from the Annual Plan, which is billed once a year. Cancel from your dashboard whenever you like.
Step 1: Pick your plan on the Sell page
- Open the Sell on Galilee Life page from the top menu.
- Read the three steps at the top, then scroll to Step 1. Pick your plan. The four plans sit side by side with their price and how many products each one allows.
- Press Choose this plan under the one you want. The page scrolls down to the sign-up form and shows your choice above it.
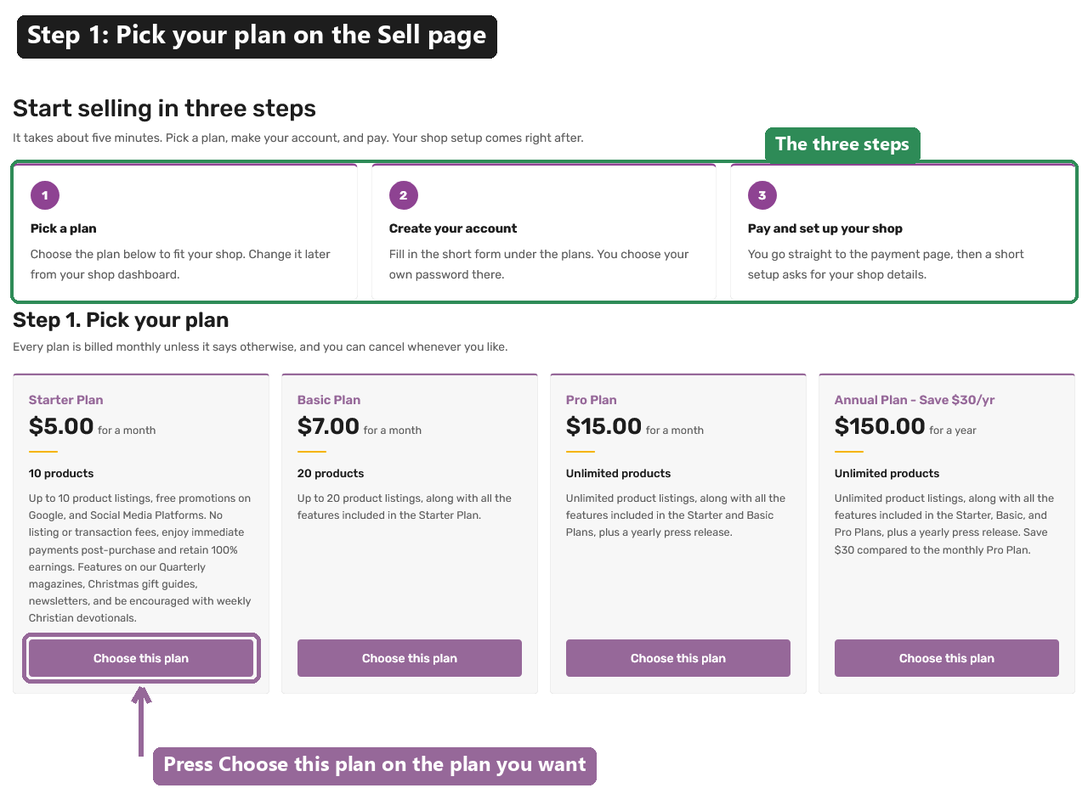
- Starter, 5 dollars a month, up to 10 products.
- Basic, 7 dollars a month, up to 20 products.
- Pro, 15 dollars a month, unlimited products.
- Annual, 150 dollars a year, unlimited products.
Step 2: Create your account
- Check the box above the form. It names the plan you picked and its price. If it’s the wrong one, press Change plan and pick again.
- Fill in your first and last name, your email address, your phone number, and a password of your own. You’ll sign in with this password later, so pick one you’ll remember.
- Type your shop name. The shop address under it fills itself in. Change it if you like.
- Press Register.

You’re signed in the moment you press Register, and you go straight to the payment page for your plan. No separate login, no waiting for an email.
Step 3: Pay for your plan
- Fill in your billing address on the left.
- On the right, under Credit / Debit Card, type your card number, expiry date and security code.
- Tick the terms box, then press Place Order.
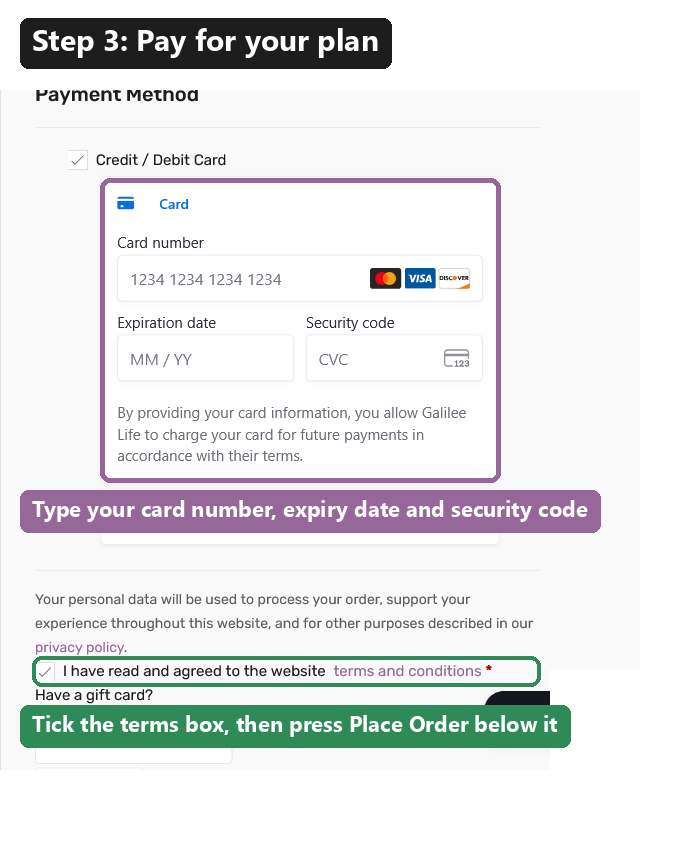
If the card is refused, the page tells you why in plain words, for example “Your card has been declined.” Fix the card details and press Place Order again. Nothing is charged until the payment goes through.
Step 4: Set up your shop
The order page opens with a box at the top: Your plan is active. One step left: set up your shop. Press Set up my shop.
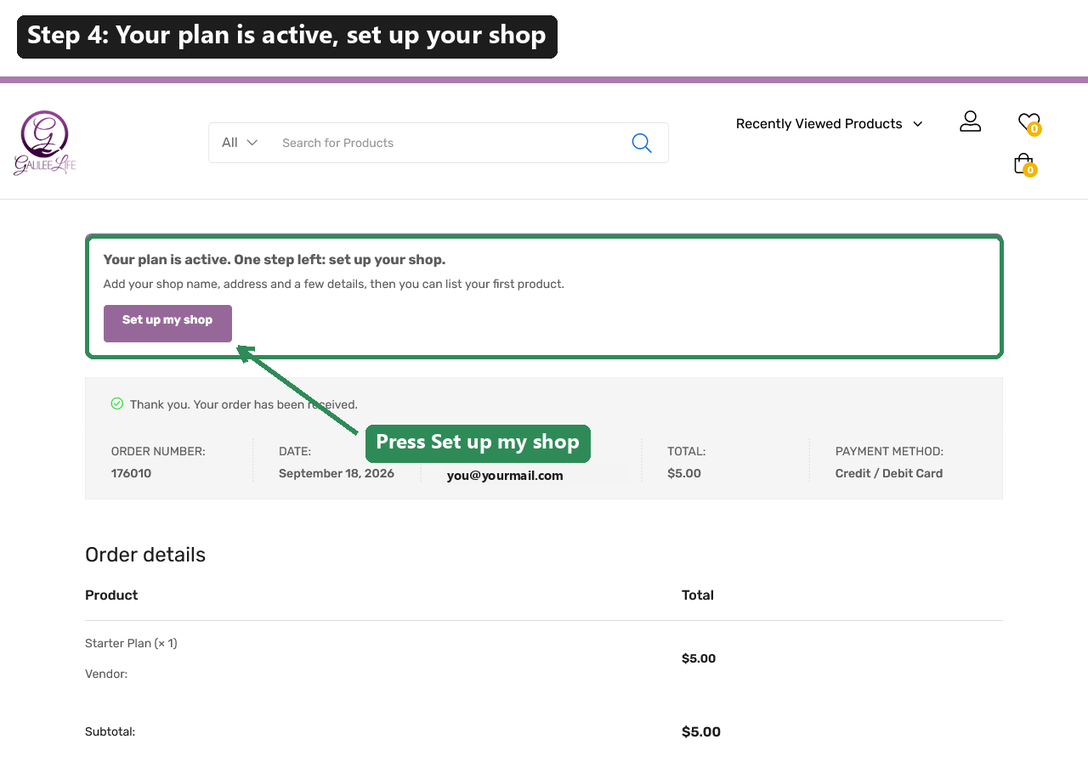
Step 5: The short shop setup
- Press Let’s Go! on the welcome screen.

- Type your shop address and press Continue.
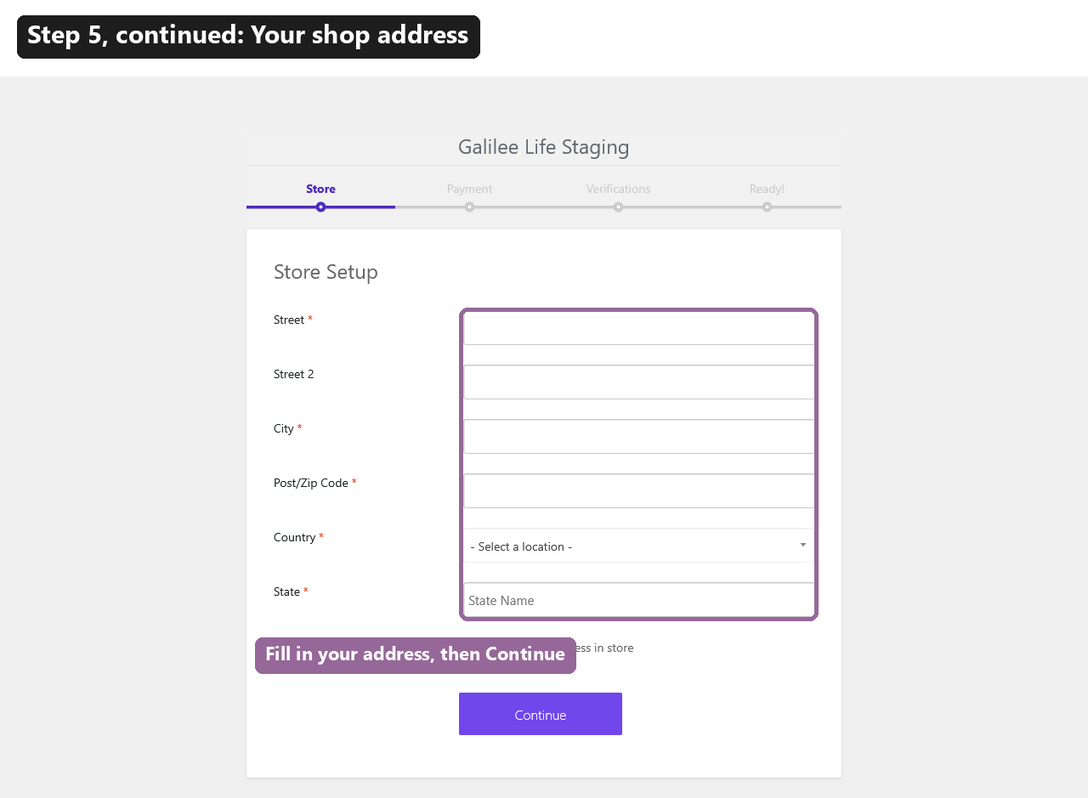
- On the payment screen, add your PayPal email or press Connect with Stripe if you’d like to set up payouts now. Or press Skip this step and do it later from Settings, then Payment (section 8 of this guide walks you through it).
- On the verifications screen, press Continue. Add ID documents later if you want the verified badge.
- Press Go to your Store Dashboard!
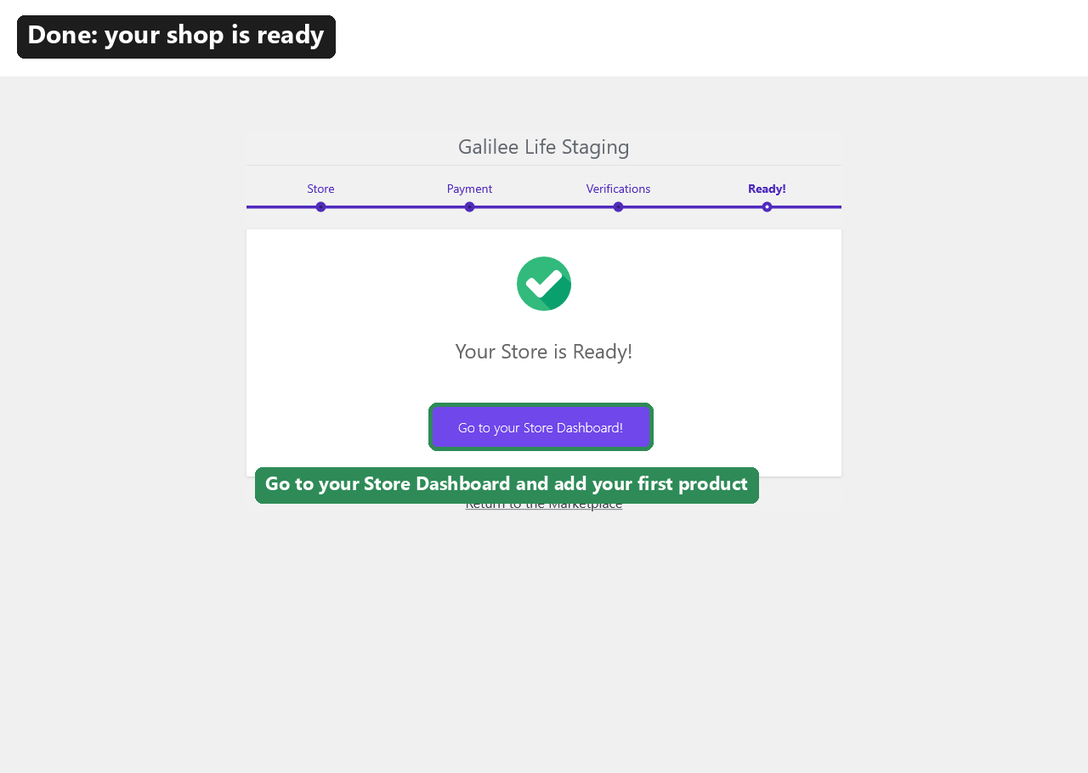
You land on your dashboard. Open Products in the left menu and press Add new product to list your first item (section 1 of this guide covers it).
Two things worth knowing:
- Two emails reach you along the way: one when your account is created, and one when your plan is paid and your shop is active. Neither one is needed to carry on, they’re a record for you.
- If you leave the page after you register and before you pay, sign in at My Account with your email and password. A box at the top of your account page says your shop is waiting on a plan, with a Choose your plan button to take you back to the plans.
1. Product Management
What you will see: A list of all your products with sales numbers, and a button to add new ones.
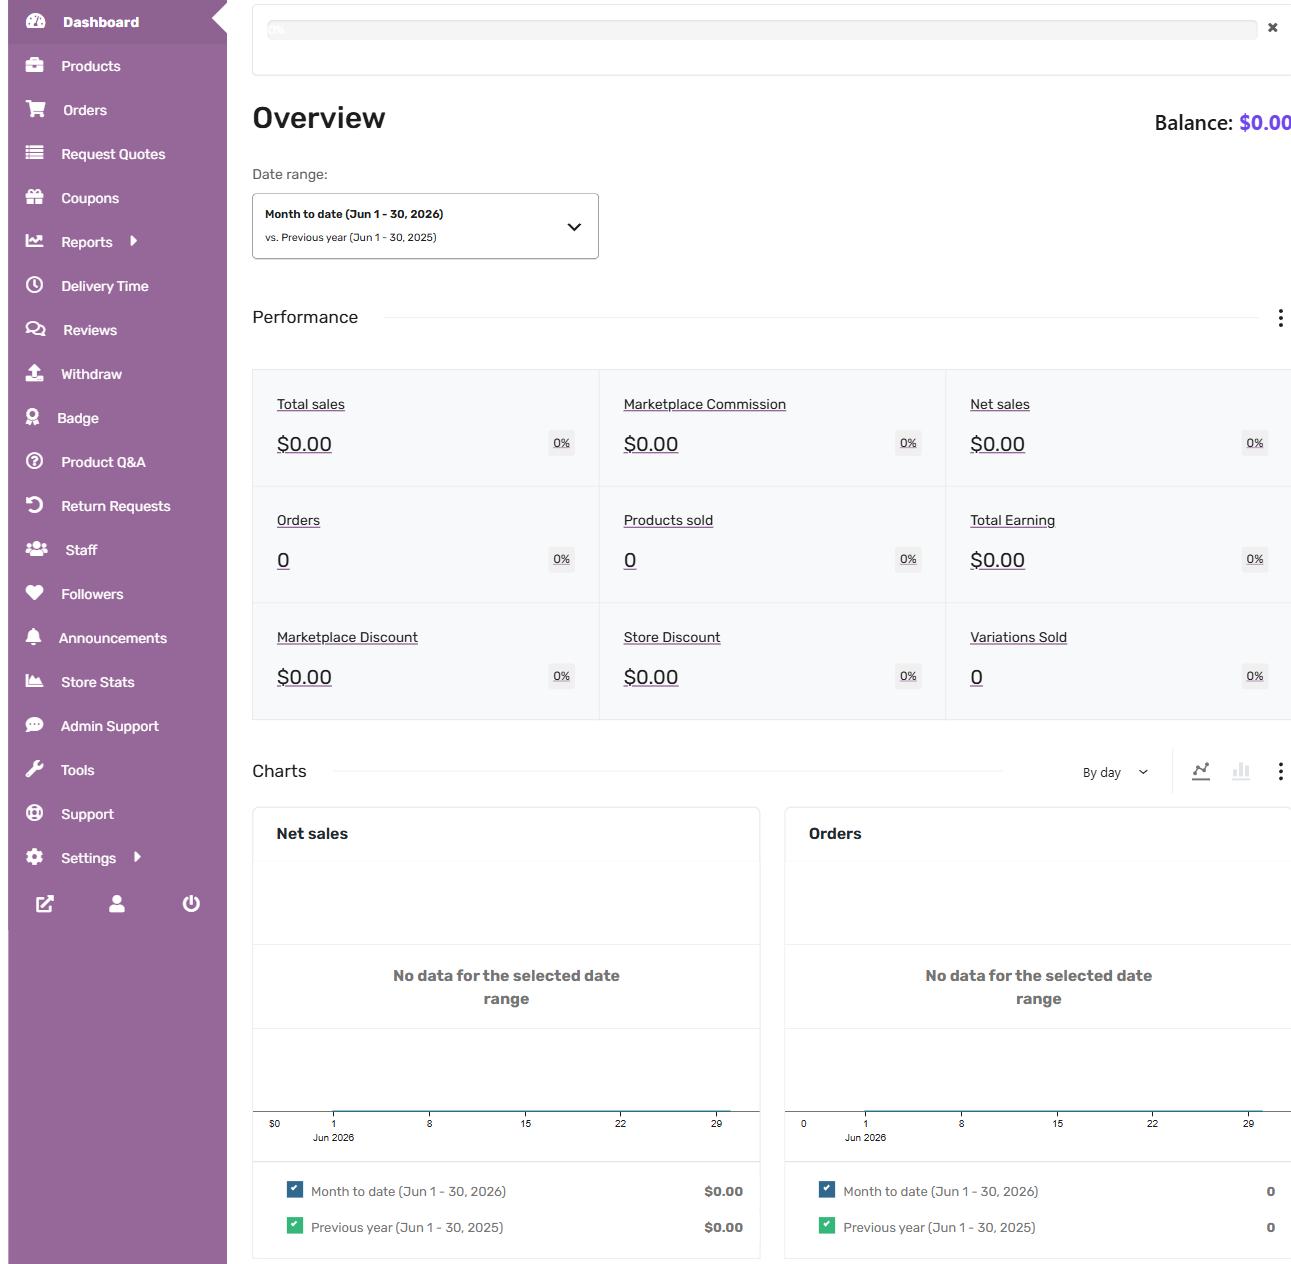
To add a new product:
- Click Products in the left menu.
- Click Add New Product.
- Enter a title, description, and price.
- Upload at least one product photo.
- Choose a category.
- Click Publish to make it live, or save as Draft if you are not ready yet.
To edit a product, click its title in the product list and make your changes, then click Update.
To add product variations (like different sizes or colors), open the product, scroll to the Variations section, and add each option with its own price and stock count.
If you have many products to add at once, use Tools > CSV Import in the left menu. This page has a sample file you can download and fill in, then upload it to add all your products in one step.
2. Orders
What you will see: A list of every order that includes one of your products, with tabs to filter by status.
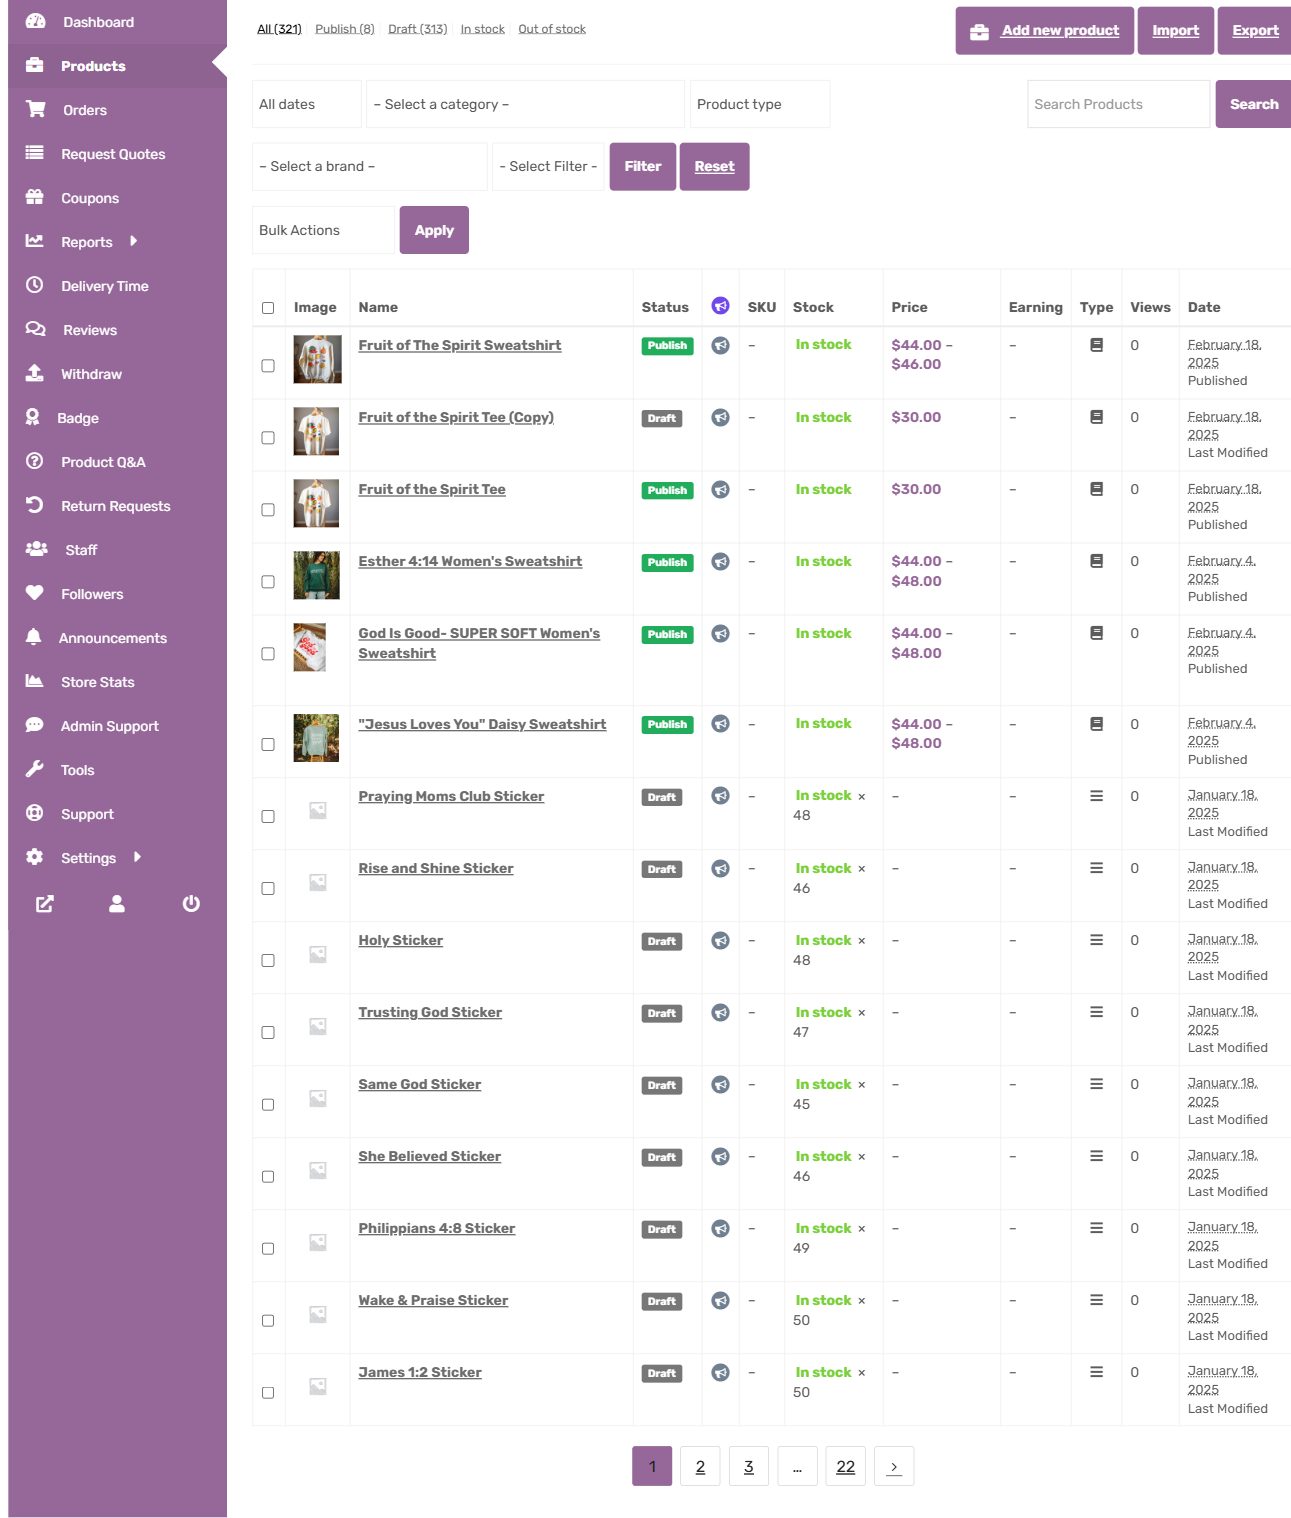
- Click Orders in the left menu.
- Use the tabs at the top to filter by status: Pending payment, Processing, On hold, Completed, Cancelled, Refunded, or Failed.
- Click any order number to see full details, including the customer’s shipping address and the items they ordered.
- Use the search box to find a specific order by number or customer name.
- Use the date filter to narrow results to a specific time period.
You can export your order list using the export button on this page if you need it for your own records.
3. Coupons
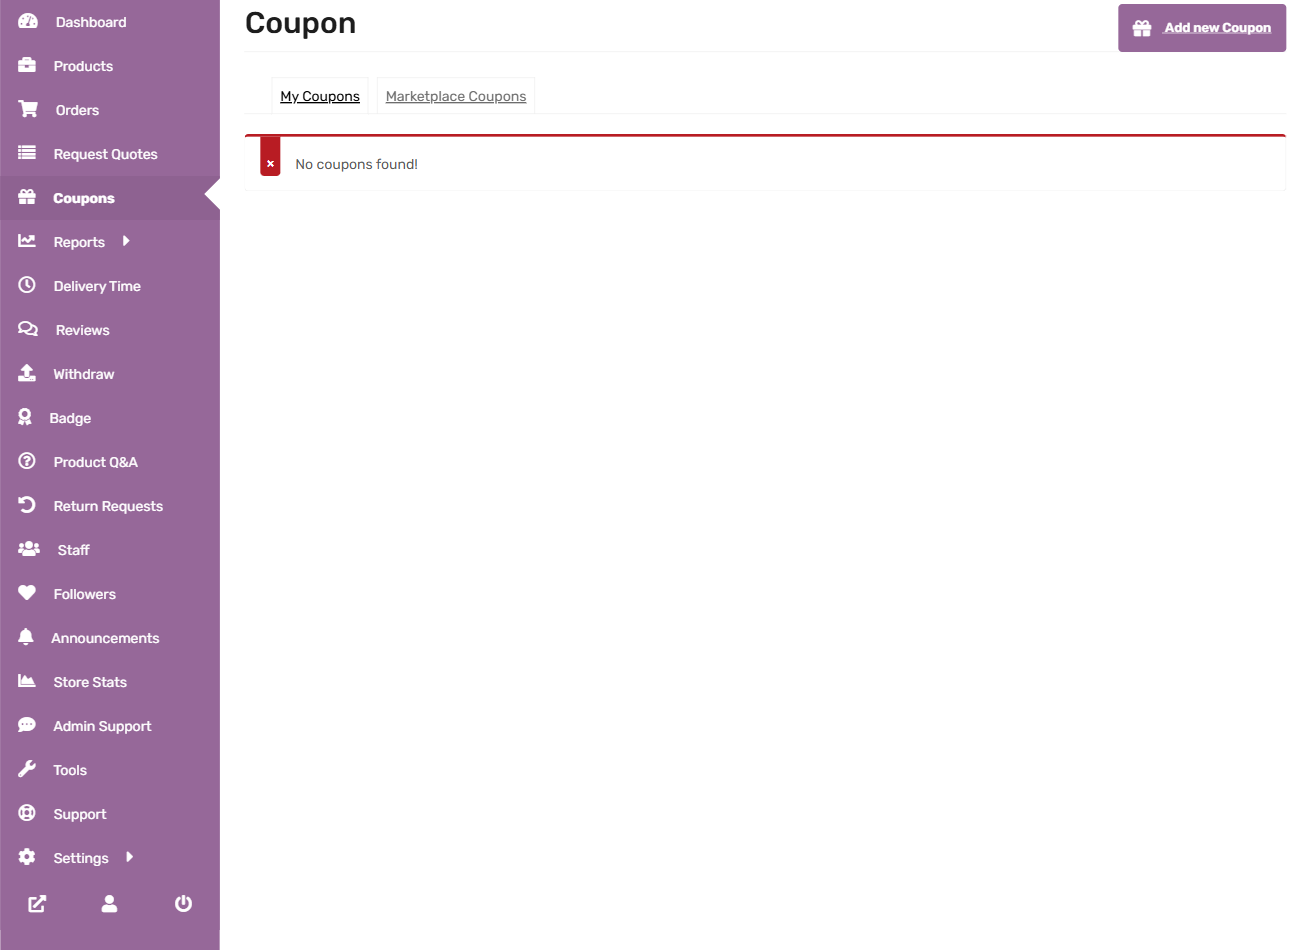
What you will see: Two tabs, My Coupons and Marketplace Coupons.
My Coupons shows only the discount codes you created for your own shop. Marketplace Coupons shows site-wide codes created by Galilee Life. You cannot edit marketplace coupons, only your own.
To create a coupon:
- Click Coupons in the left menu.
- Click Add New Coupon.
- Enter a code name (this is what customers type at checkout).
- Choose a discount type: a fixed dollar amount or a percentage.
- Set an expiry date if you want the coupon to stop working after a certain day.
- If you want the coupon to apply only to certain products, select them in the Products field.
- Click Publish.
4. Reports
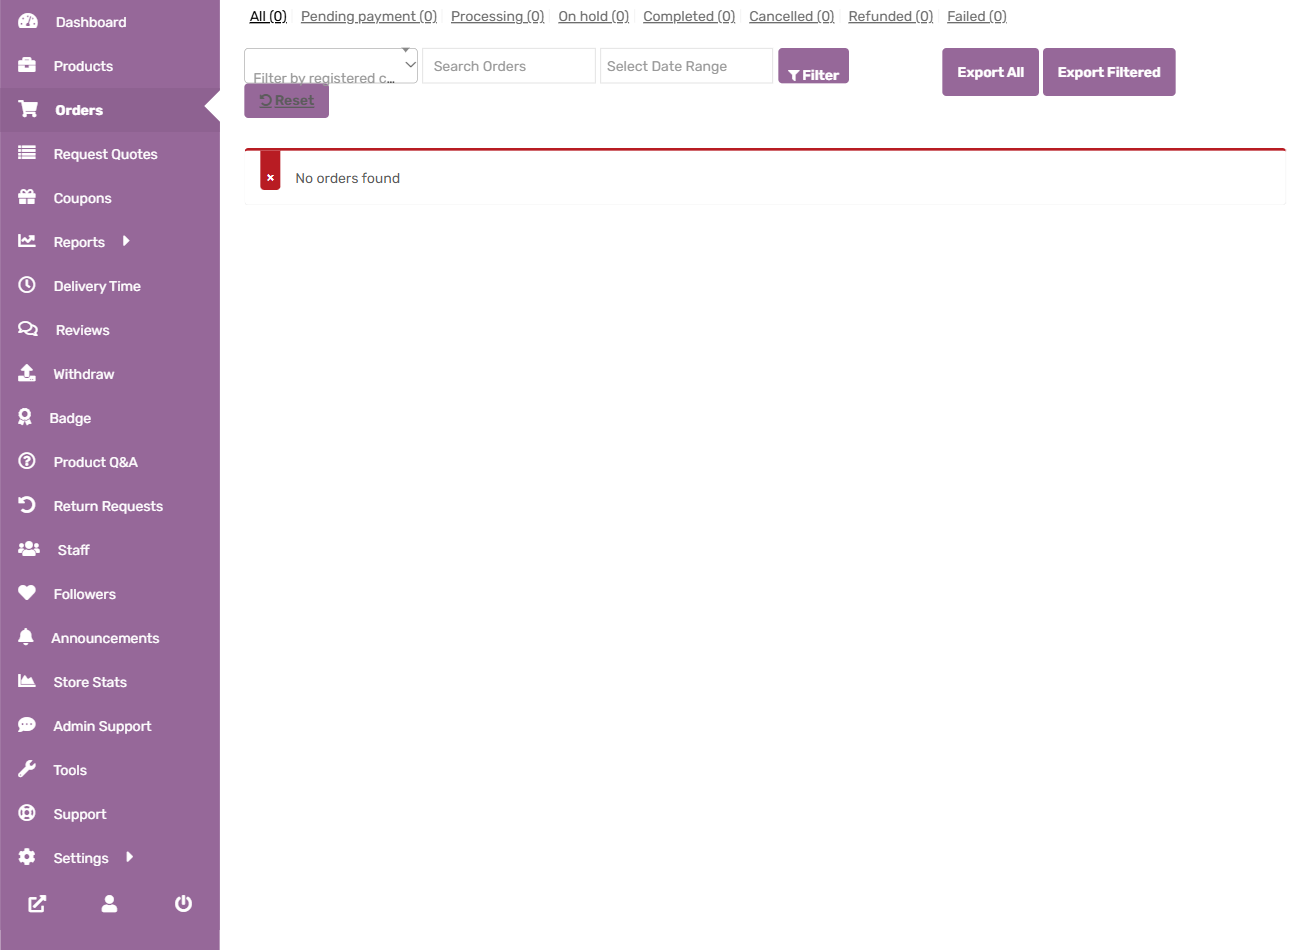
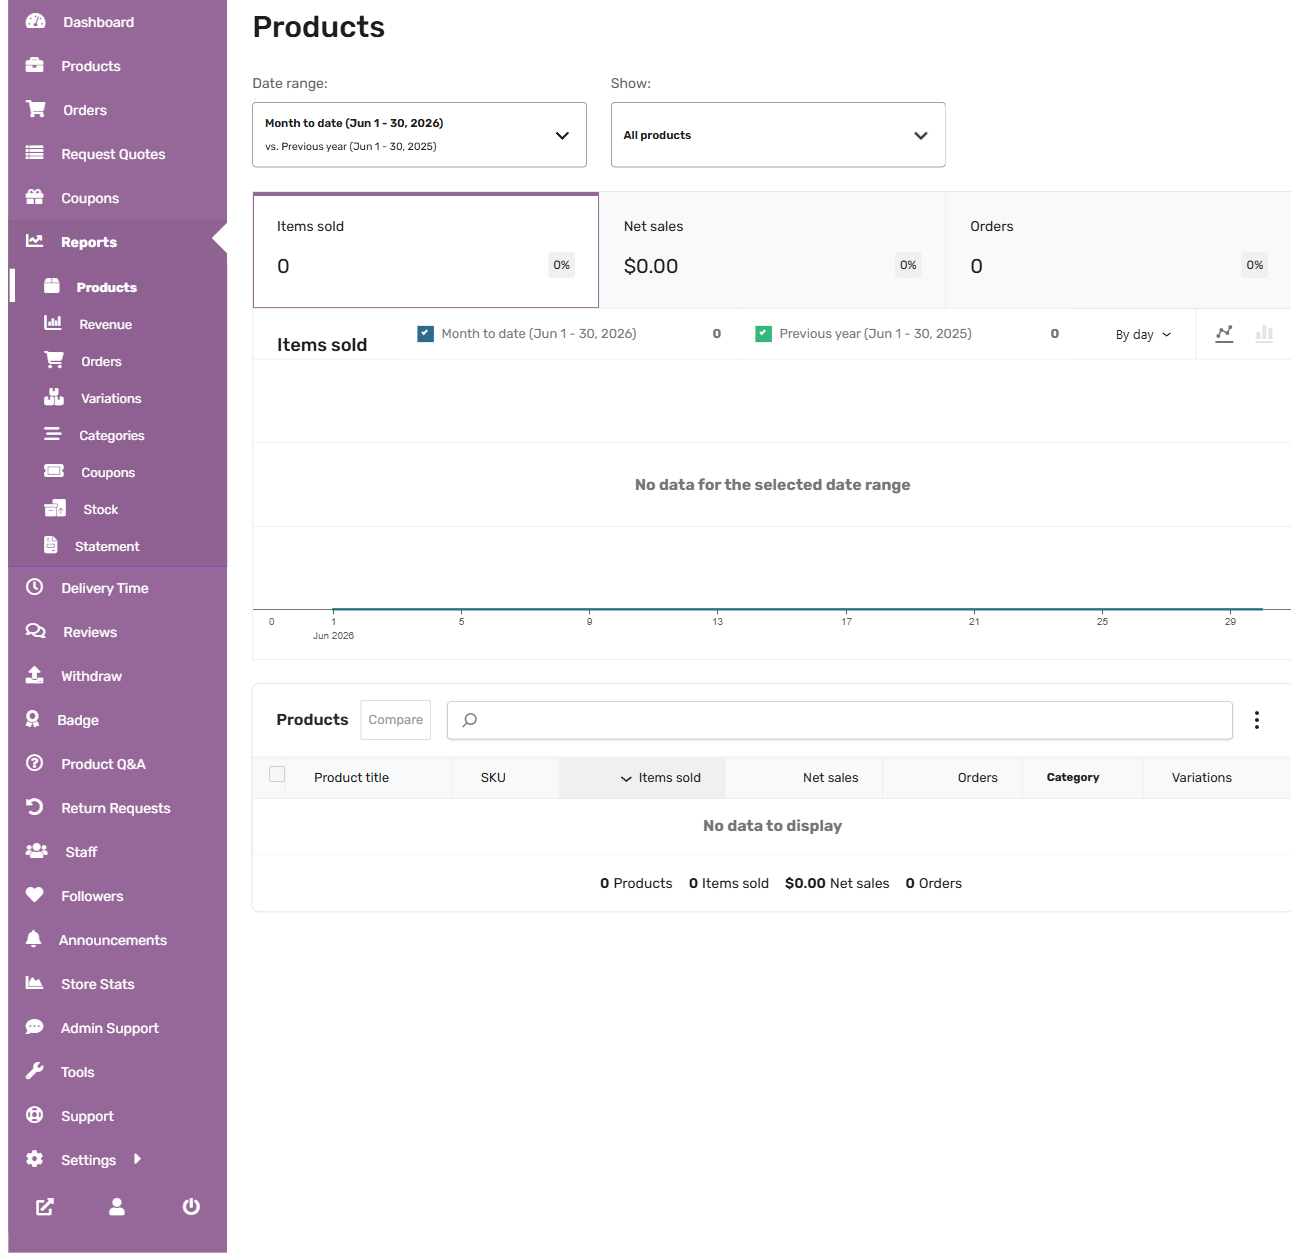
What you will see: A summary page showing how your shop is performing, with a date range you can change.
The Overview page shows your totals for the period you select: items sold, net sales, and number of orders. Below that, two charts show your sales and orders by day.
To change the time period, click the date range box near the top and choose a different range.
For more detail, click Reports in the left menu to see sub-reports broken down by Products, Revenue, Orders, Variations, Categories, Coupons, Stock, and a full Statement of all transactions.
Key terms:
- Total sales — everything customers paid, including shipping and tax.
- Net sales — your sales after refunds are removed.
- Total Earning — what you receive after the marketplace commission is taken out.
- Marketplace Commission — the percentage Galilee Life keeps from each sale.
5. Settings
What you will see: A menu of settings sections for your store.
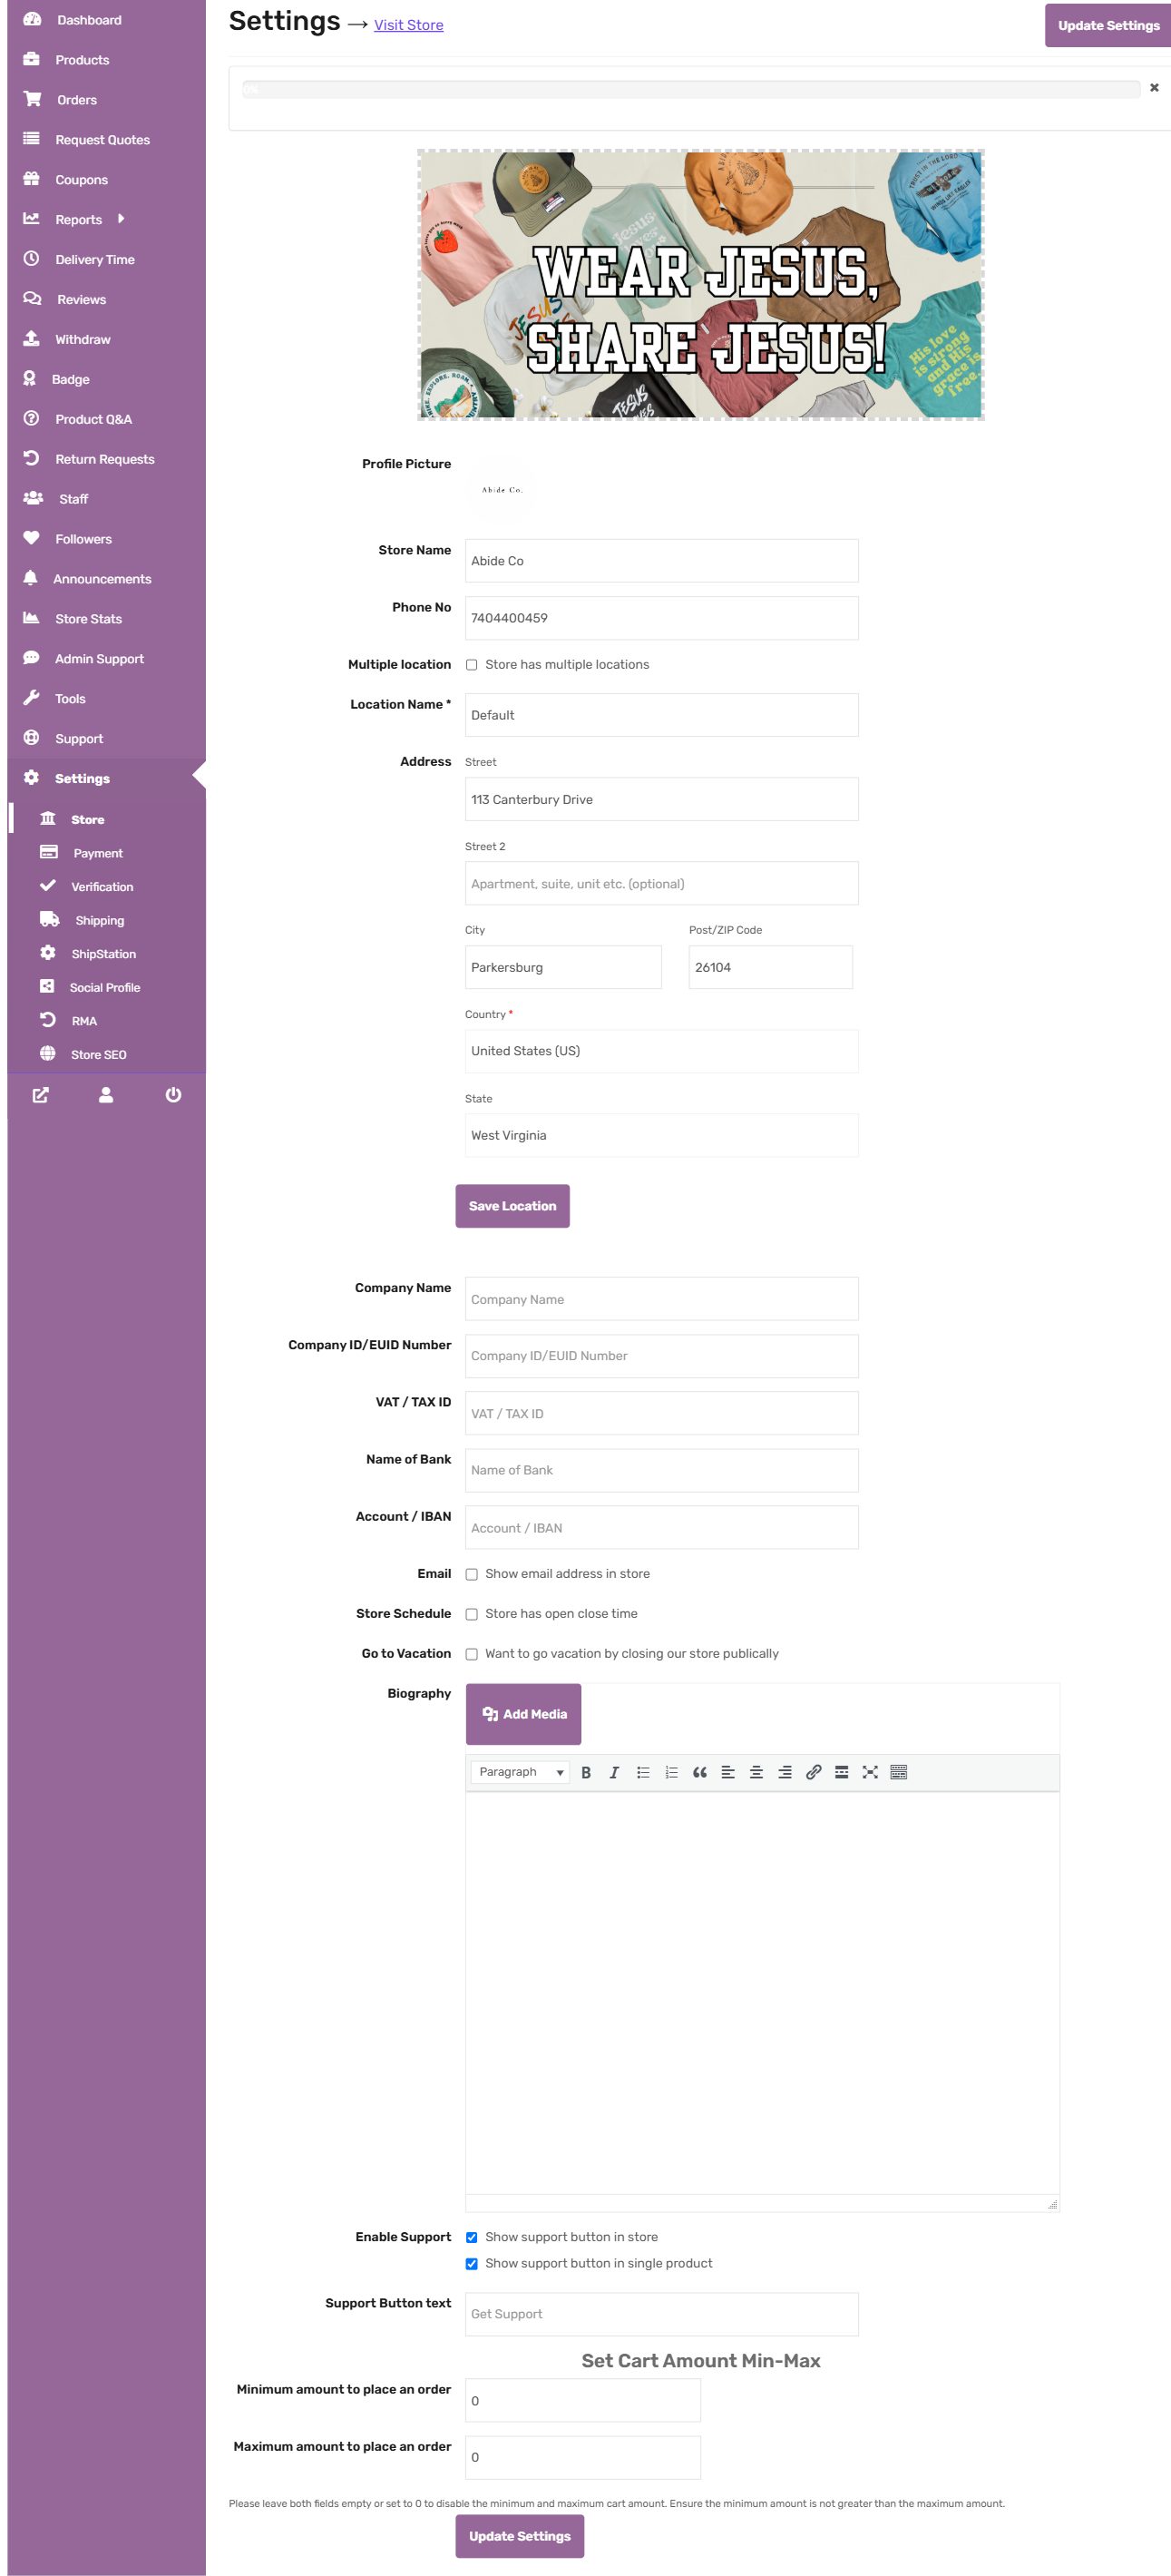
Click Settings in the left menu, then choose a section:
- Store — your shop name, phone number, address, a short biography about your shop, and your open/close schedule.
- Payment, where you add your PayPal email or connect your Stripe account so you get paid. See the Payouts section below for details.
- Verification — shows your verification badge status. Document uploads here are optional, not required.
- Shipping — shipping zones are set by Galilee Life for the whole marketplace. You do not need to set up your own shipping zones.
- ShipStation — if you print shipping labels through ShipStation, click Generate Credentials here to connect your own ShipStation account.
- Social Profile — add links to your shop’s Facebook, Instagram, or other social pages.
- Store SEO — set a title and description for how your shop page appears in search engines.
Save your changes on each tab before moving to the next one.
Hiding the sold count on your product pages
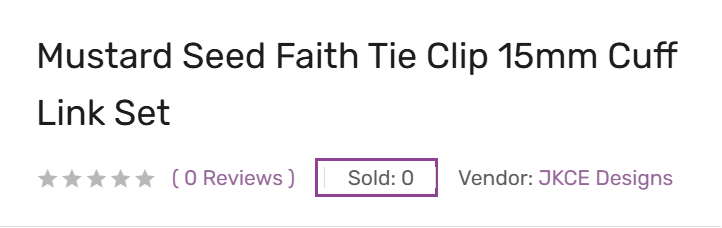
Your product pages show a line reading Sold: 0 until you make your first sales. There is a setting to turn this off if you prefer customers not to see the number.
- Click Settings in the left menu, then Store.
- Scroll to the bottom of the page and find Sold Count.
- Tick the box marked Hide the number of items sold on my product pages.
- Click Update Settings.

The number disappears from every one of your product pages right away. Untick the box and save again to bring it back. This setting applies to your own shop only, and it starts switched off for everyone.
6. Support (Contacting the Marketplace Admin)
What you will see: A simple ticket form for reaching the Galilee Life team.
Use Admin Support in the left menu when you need help from Galilee Life directly, for example a question about your account or a technical problem.
- Click Admin Support in the left menu.
- Click New Ticket (or use the search box to check if your question was already answered).
- Write a short, clear description of your issue.
- Click Submit.
You will see your ticket listed under Open Tickets until it is answered, then it moves to Closed Tickets.
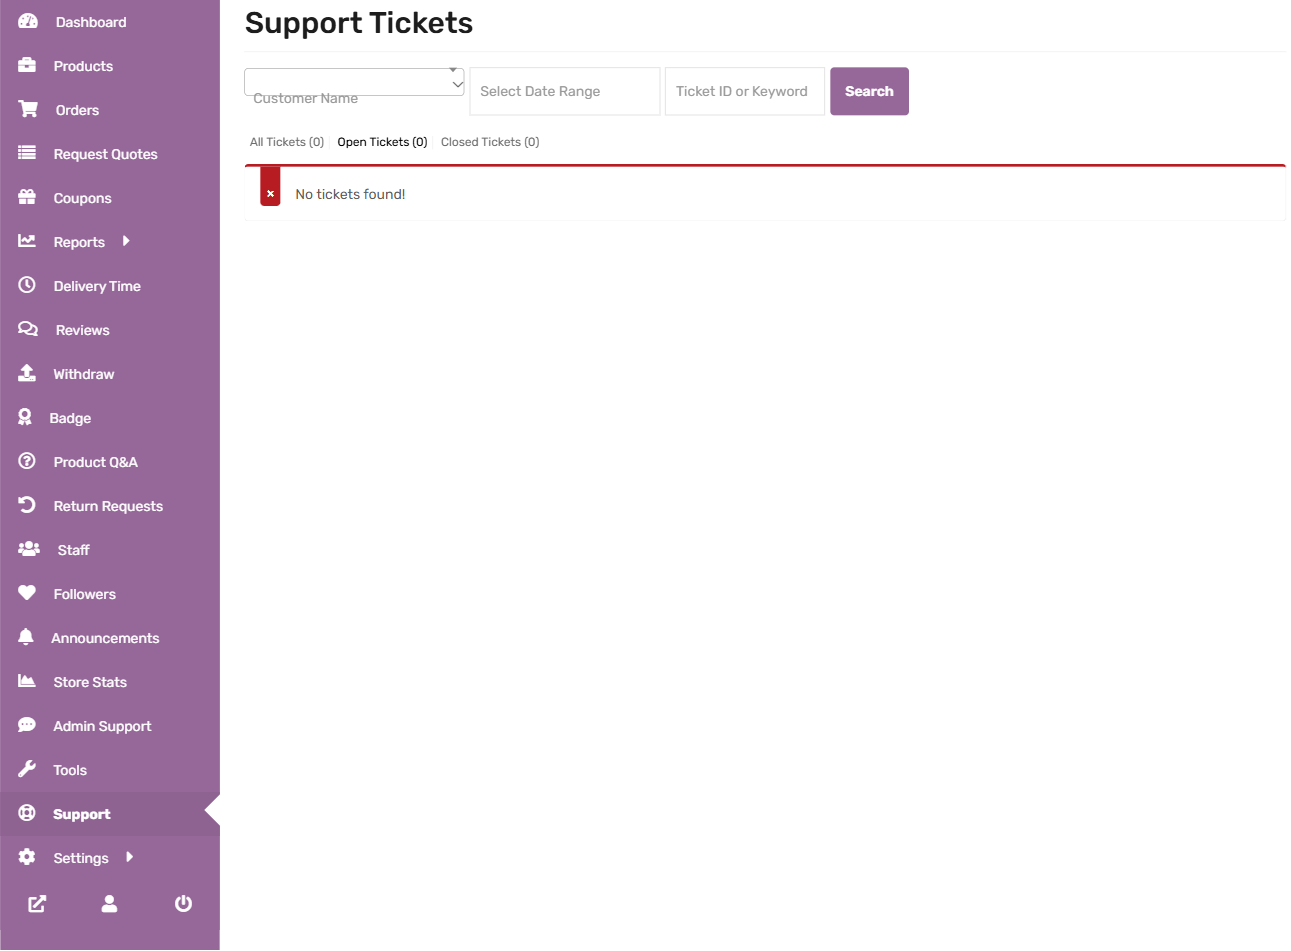
Note: this is different from the Support tab, which is for handling questions your own customers send you about their orders, not for contacting Galilee Life.
7. Shipping and Delivery
You set your own delivery price. Shoppers pay it at checkout on top of the item price, and it comes to you with the order. If you don’t set one, shoppers are charged a standard 4.99 for delivery of your items, so it’s worth setting a price which matches what postage costs you.
Set your store’s delivery price
- In your dashboard, click Settings in the left menu, then Shipping. The page which opens lists delivery zones. Near the top it says “If you want to use the previous shipping system then Click Here”. Click that link, and the screen with your own price and countries opens.
- Tick Enable shipping.
- Default Shipping Price is what a shopper pays for delivery of your items in one order. Put your usual postage cost here.
- Per Product Additional Price is added once for each extra product in the same order. Per Qty Additional Price is added for each extra copy of the same product. Leave either one blank if you don’t want to add anything.
- Under Processing Time, choose how long you need before you post.
- Under Ships from, pick your country. Under Ship to, add a row for each place you post to. The row named Everywhere Else covers any address not listed above it.
- Click Save Settings. A green bar reading “Shipping options saved successfully” confirms it.
Charge more for one product
You can give a single product a higher delivery charge than the rest of your shop. Open the product, scroll to Shipping and Tax, and tick Override your store’s default shipping cost for this product. Three boxes appear: Additional cost, Per Qty Additional Price and Processing Time.
The catch, and it trips most people up the first time: the amount you put in Additional cost is added on top of your store’s default price. It doesn’t replace it. So a product can cost the same or more to deliver than your store price, but never less.
Say you sell stickers and sweatshirts. Set your store’s Default Shipping Price to what a sticker costs you to post, 1.50 for example. Then open the sweatshirt, tick the override box and put 6.50 in Additional cost. A shopper now pays 1.50 to have a sticker delivered and 8.00 for the sweatshirt. If you did it the other way round, with the store price at 8.00 and 1.50 on the sticker, the sticker would come out at 9.50. Start from your cheapest item and add the extra on the heavier ones.
Where the weight goes
Some delivery prices are worked out from how heavy a parcel is, so it is worth filling in the weight on every product you post. Weights on this marketplace are in pounds.
A plain product, one version of it. Open the product and scroll to Shipping and Tax. Tick This product requires shipping, and the Weight box appears underneath, alongside length, width and height. Type the weight in and save.
A product with choices, like sizes or colors. There is no weight box on the main screen at all, and that is the part which catches people out. Each choice carries its own weight instead. Open the product, go to Variations, click one variation to open it, and the Weight box is inside. Fill it in for each choice, then save.
If there is no Shipping and Tax section anywhere on the product, that product is marked as virtual. A virtual product never asks for a weight and never charges delivery, so if you do post that item in the mail, untick virtual first and the section appears.
Other things to know
Shoppers also see a Local pickup choice at no charge, which is there for anyone who collects in person.
Digital and downloadable products are never charged delivery. If a product of yours is marked as virtual, it won’t show a delivery price and won’t show the Shipping and Tax boxes either, so check that box if you sell something which does get posted.
If you post from outside the United States, let the Galilee Life team know at info@galilee-life.com before you set a price, so your country is covered.
If your shop uses scheduled deliveries or pickups, click Delivery Time in the left menu to see a calendar of booked time slots.
If you print your own shipping labels through ShipStation, connect your account at Settings > ShipStation > Generate Credentials.
Using the Delivery Price Table
Table Rate is the other way to charge for delivery, next to the flat price described above. Turn it on and the price grid starts out empty, with no numbers in it at all. That’s not a fault. Nothing gets charged until you type in your first row yourself.
Here’s how to set it up.
- In your dashboard, click Settings, then Shipping.
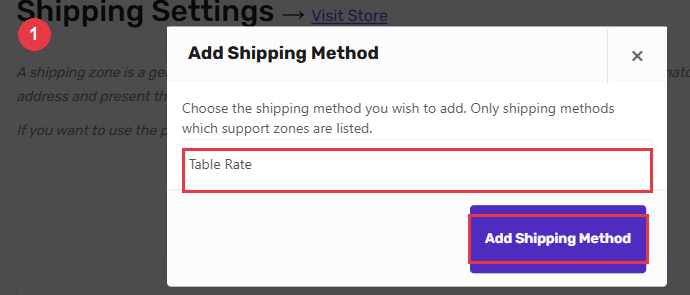
- Pick the delivery zone you want to price, then click Add Shipping Method.
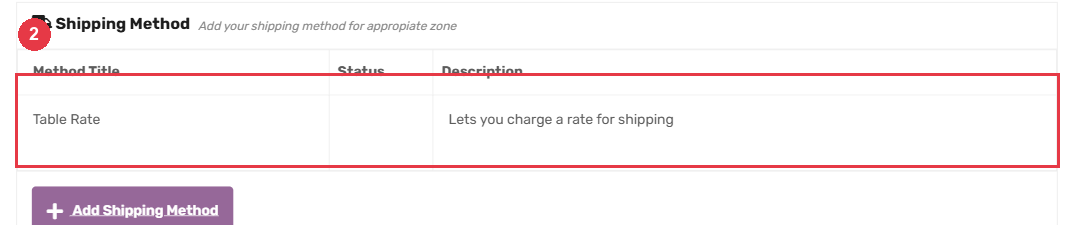
- Choose Table Rate from the list, then click Add Shipping Method again to save it. It appears in the method list right away, still empty.
- Click Edit next to it. This opens the price grid.
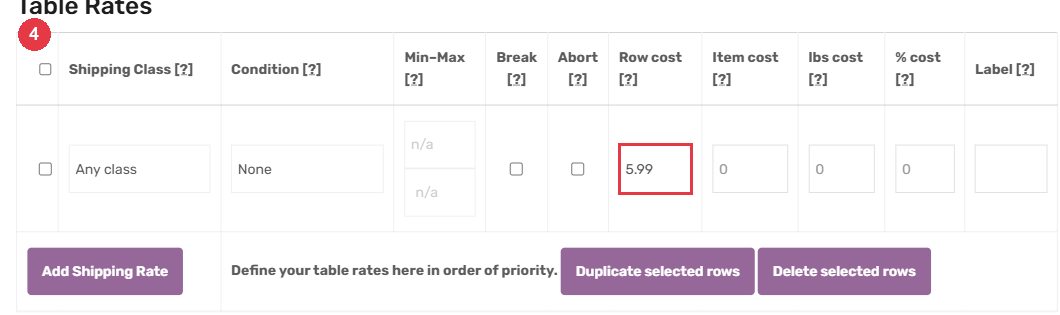
- Click Add Shipping Rate. A new row appears with every box reading 0.
- Type your price into the Row cost box, then save. From that point on, a shopper in this zone is charged that price automatically.

Where does the price come from?
There’s no automatic calculator behind this box the way there used to be. You choose the number, based on what shipping actually costs you. The simplest way is to check your own carrier’s price for a typical parcel you send, or look back at a receipt from a package you already shipped, and use that figure. If your products are all a similar size and weight, one row covers everything. If a few of them cost more to post, you can add a second row later for those, or set a different price by weight instead of one flat number for the whole zone.
A free way to check what shipping might cost before you set your price: USPS’s Retail Postage Price Calculator (postcalc.usps.com) covers both domestic and international destinations, UPS has its own Shipping Cost Calculator (ups.com), and FedEx has its own Calculate Shipping Rates tool (fedex.com). All three are free, need no account, and do not require an actual shipment.
ShipStation works separately from all of this. Each seller connects their own account with their own credentials, from Settings, then ShipStation. Your connection only ever shows your own orders, never anyone else’s.
8. Payouts (Withdraw)
What you will see: Your current balance and your saved payment methods.
You have two ways to get paid: PayPal, or your own Stripe account. Bank transfer is no longer offered.
To get paid straight from Stripe, with no payout request needed:
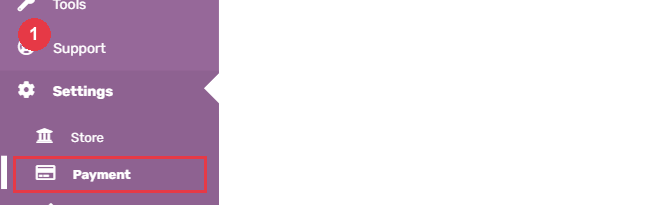
- Click Settings > Payment in the left menu.
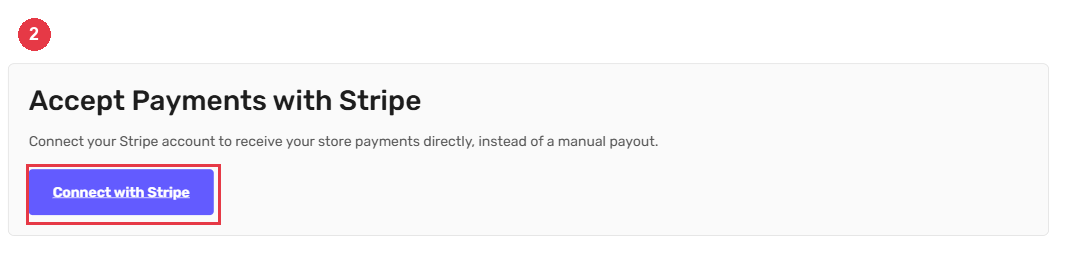
- Find the card called Accept Payments with Stripe and click Connect with Stripe.
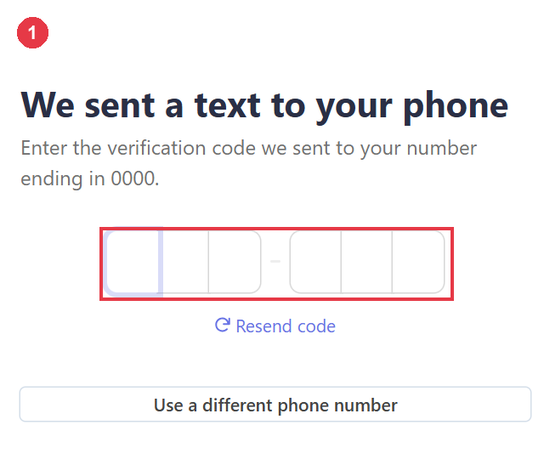
- Stripe opens its own sign-up. It takes about five minutes, and if you already have a Stripe account you sign in to it there instead. Here’s what it asks, screen by screen.
Screen 1. Your email and phone number. Stripe texts a six digit code to the phone you gave. Type it in.
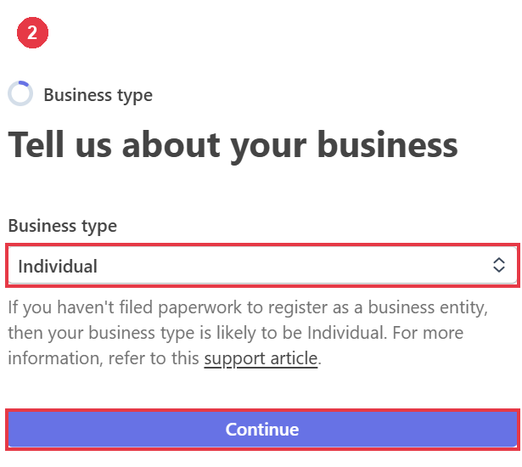
Screen 2. Your business type. Most sellers pick Individual. Click Continue.
Screen 3. Your legal name, date of birth, home address, phone number and the last four digits of your Social Security number. Stripe needs these by law before it pays anyone. Click Submit.

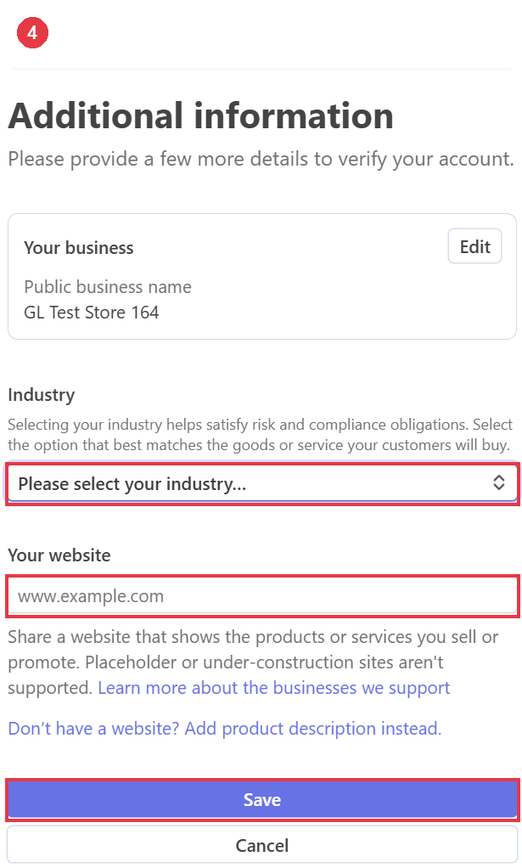
Screen 4. Your industry and a website. Pick the industry closest to what you sell, and for the website paste the link to your own shop on Galilee Life. Click Save.
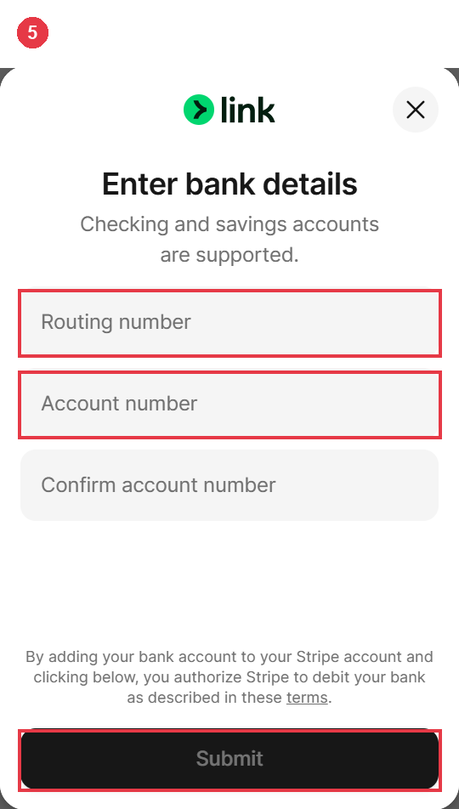
Screen 5. Your bank account. Stripe offers to find it through your bank’s own login, or you type the routing number and account number yourself. This is the account your money lands in.
Screen 6. The name shoppers see on their card statement. Type your shop name. Stripe wants it close to your legal name or your shop link, so keep it plain. Don’t worry about the Shortened descriptor box, leave it empty. Click Continue.

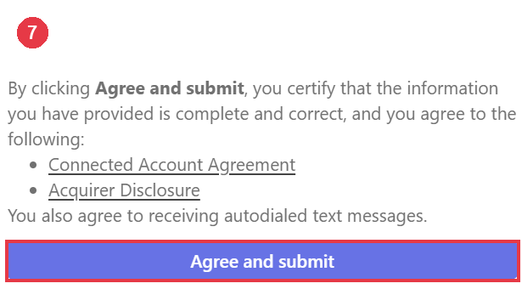
Screen 7. A review of everything you entered. Check it, then click Agree and submit.
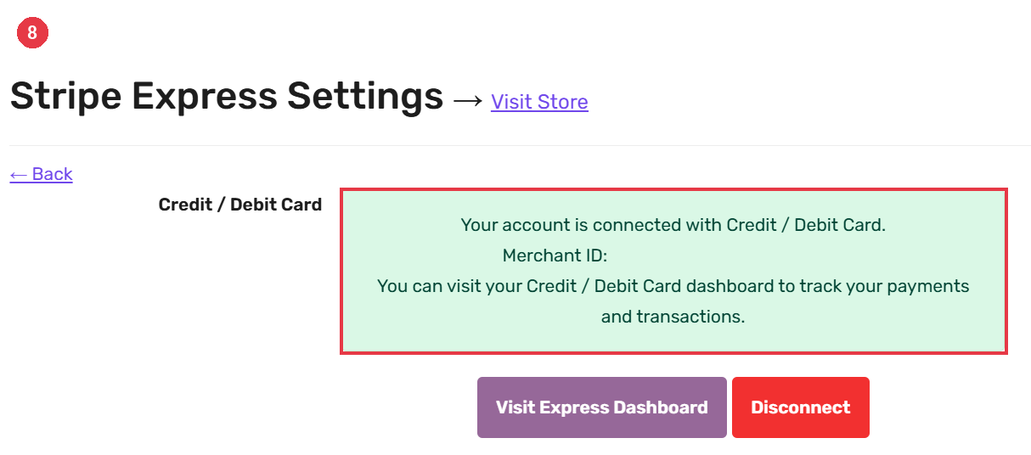
Screen 8. Stripe sends you back to your dashboard, and a green box tells you your account is connected. From then on your store payments go to your Stripe account on their own, about 14 days after each order. If the page asks you to Complete Onboarding instead, click it, Stripe shows one more review screen, and Confirm finishes it.
To get paid through PayPal instead:
- Click Settings > Payment in the left menu.
- Click Add Payment Method, choose PayPal, and enter your PayPal email.
- Save your details.
To request a PayPal payout:
- Click Withdraw in the left menu.
- Check your current balance at the top of the page.
- Click Request Withdraw.
There is a minimum balance required before a withdrawal request goes through, shown on the Withdraw page. Your PayPal details are stored securely and used only to send you your earnings. If you connected Stripe, you don’t need this step at all.
9. Request a Quote (Custom Pricing)
What it is: This feature lets customers ask for a custom price on any product instead of buying at the listed price. The customer sends you a message with what they want, and you reply with your price offer. They can then accept or decline.
Part A: What the Customer Does
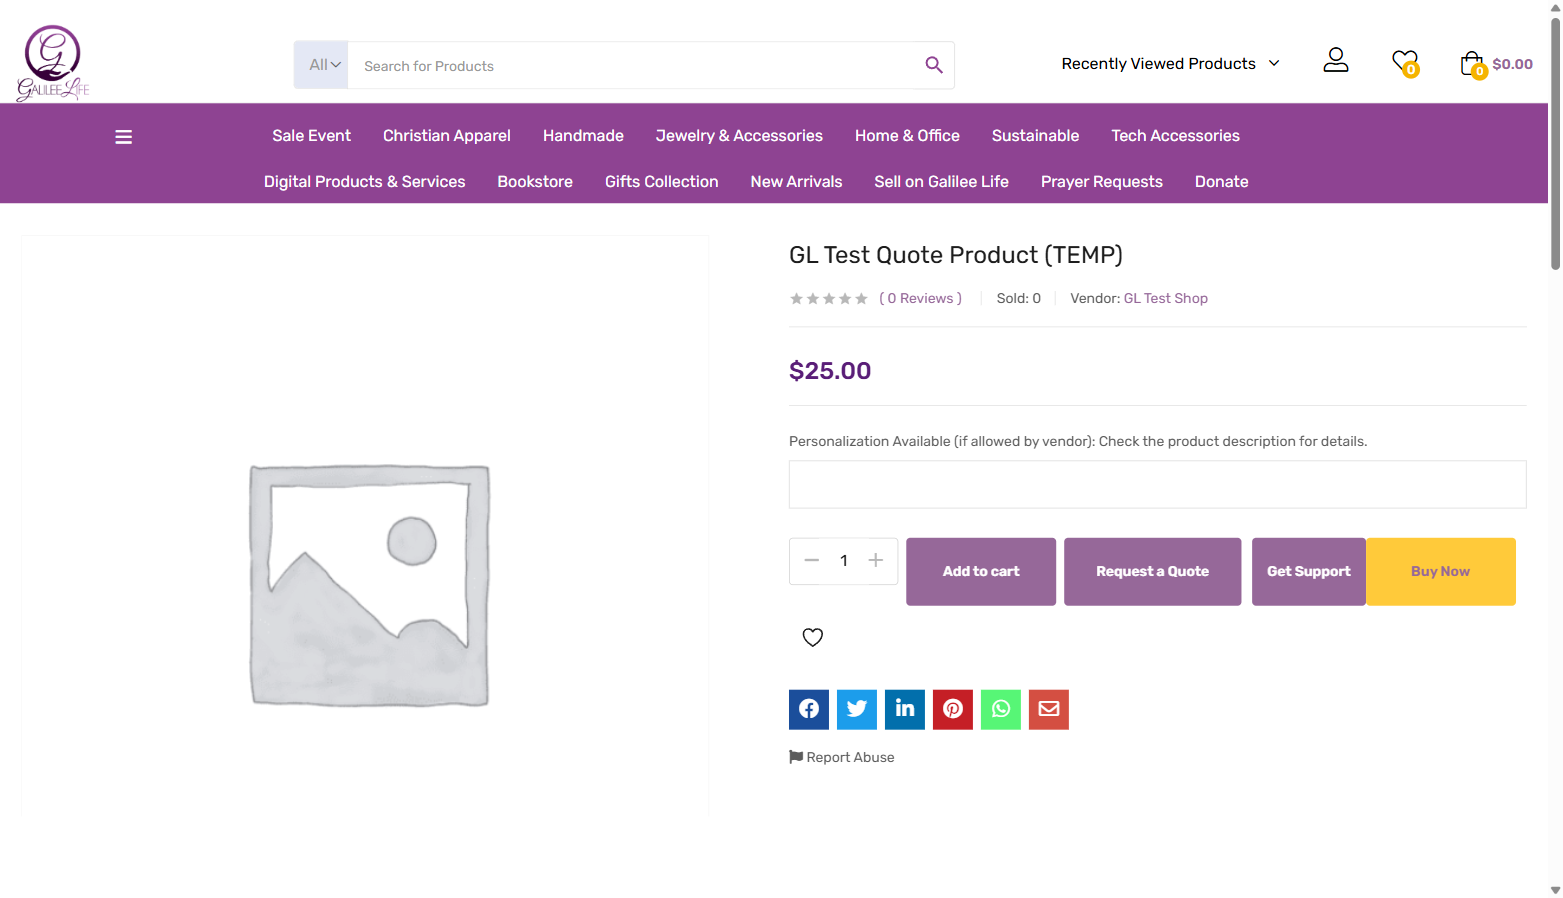
Step 1 — Customer finds the Request a Quote button on the product page. When this feature is active, a “Request a Quote” button appears on the product page alongside the normal Add to Cart button.
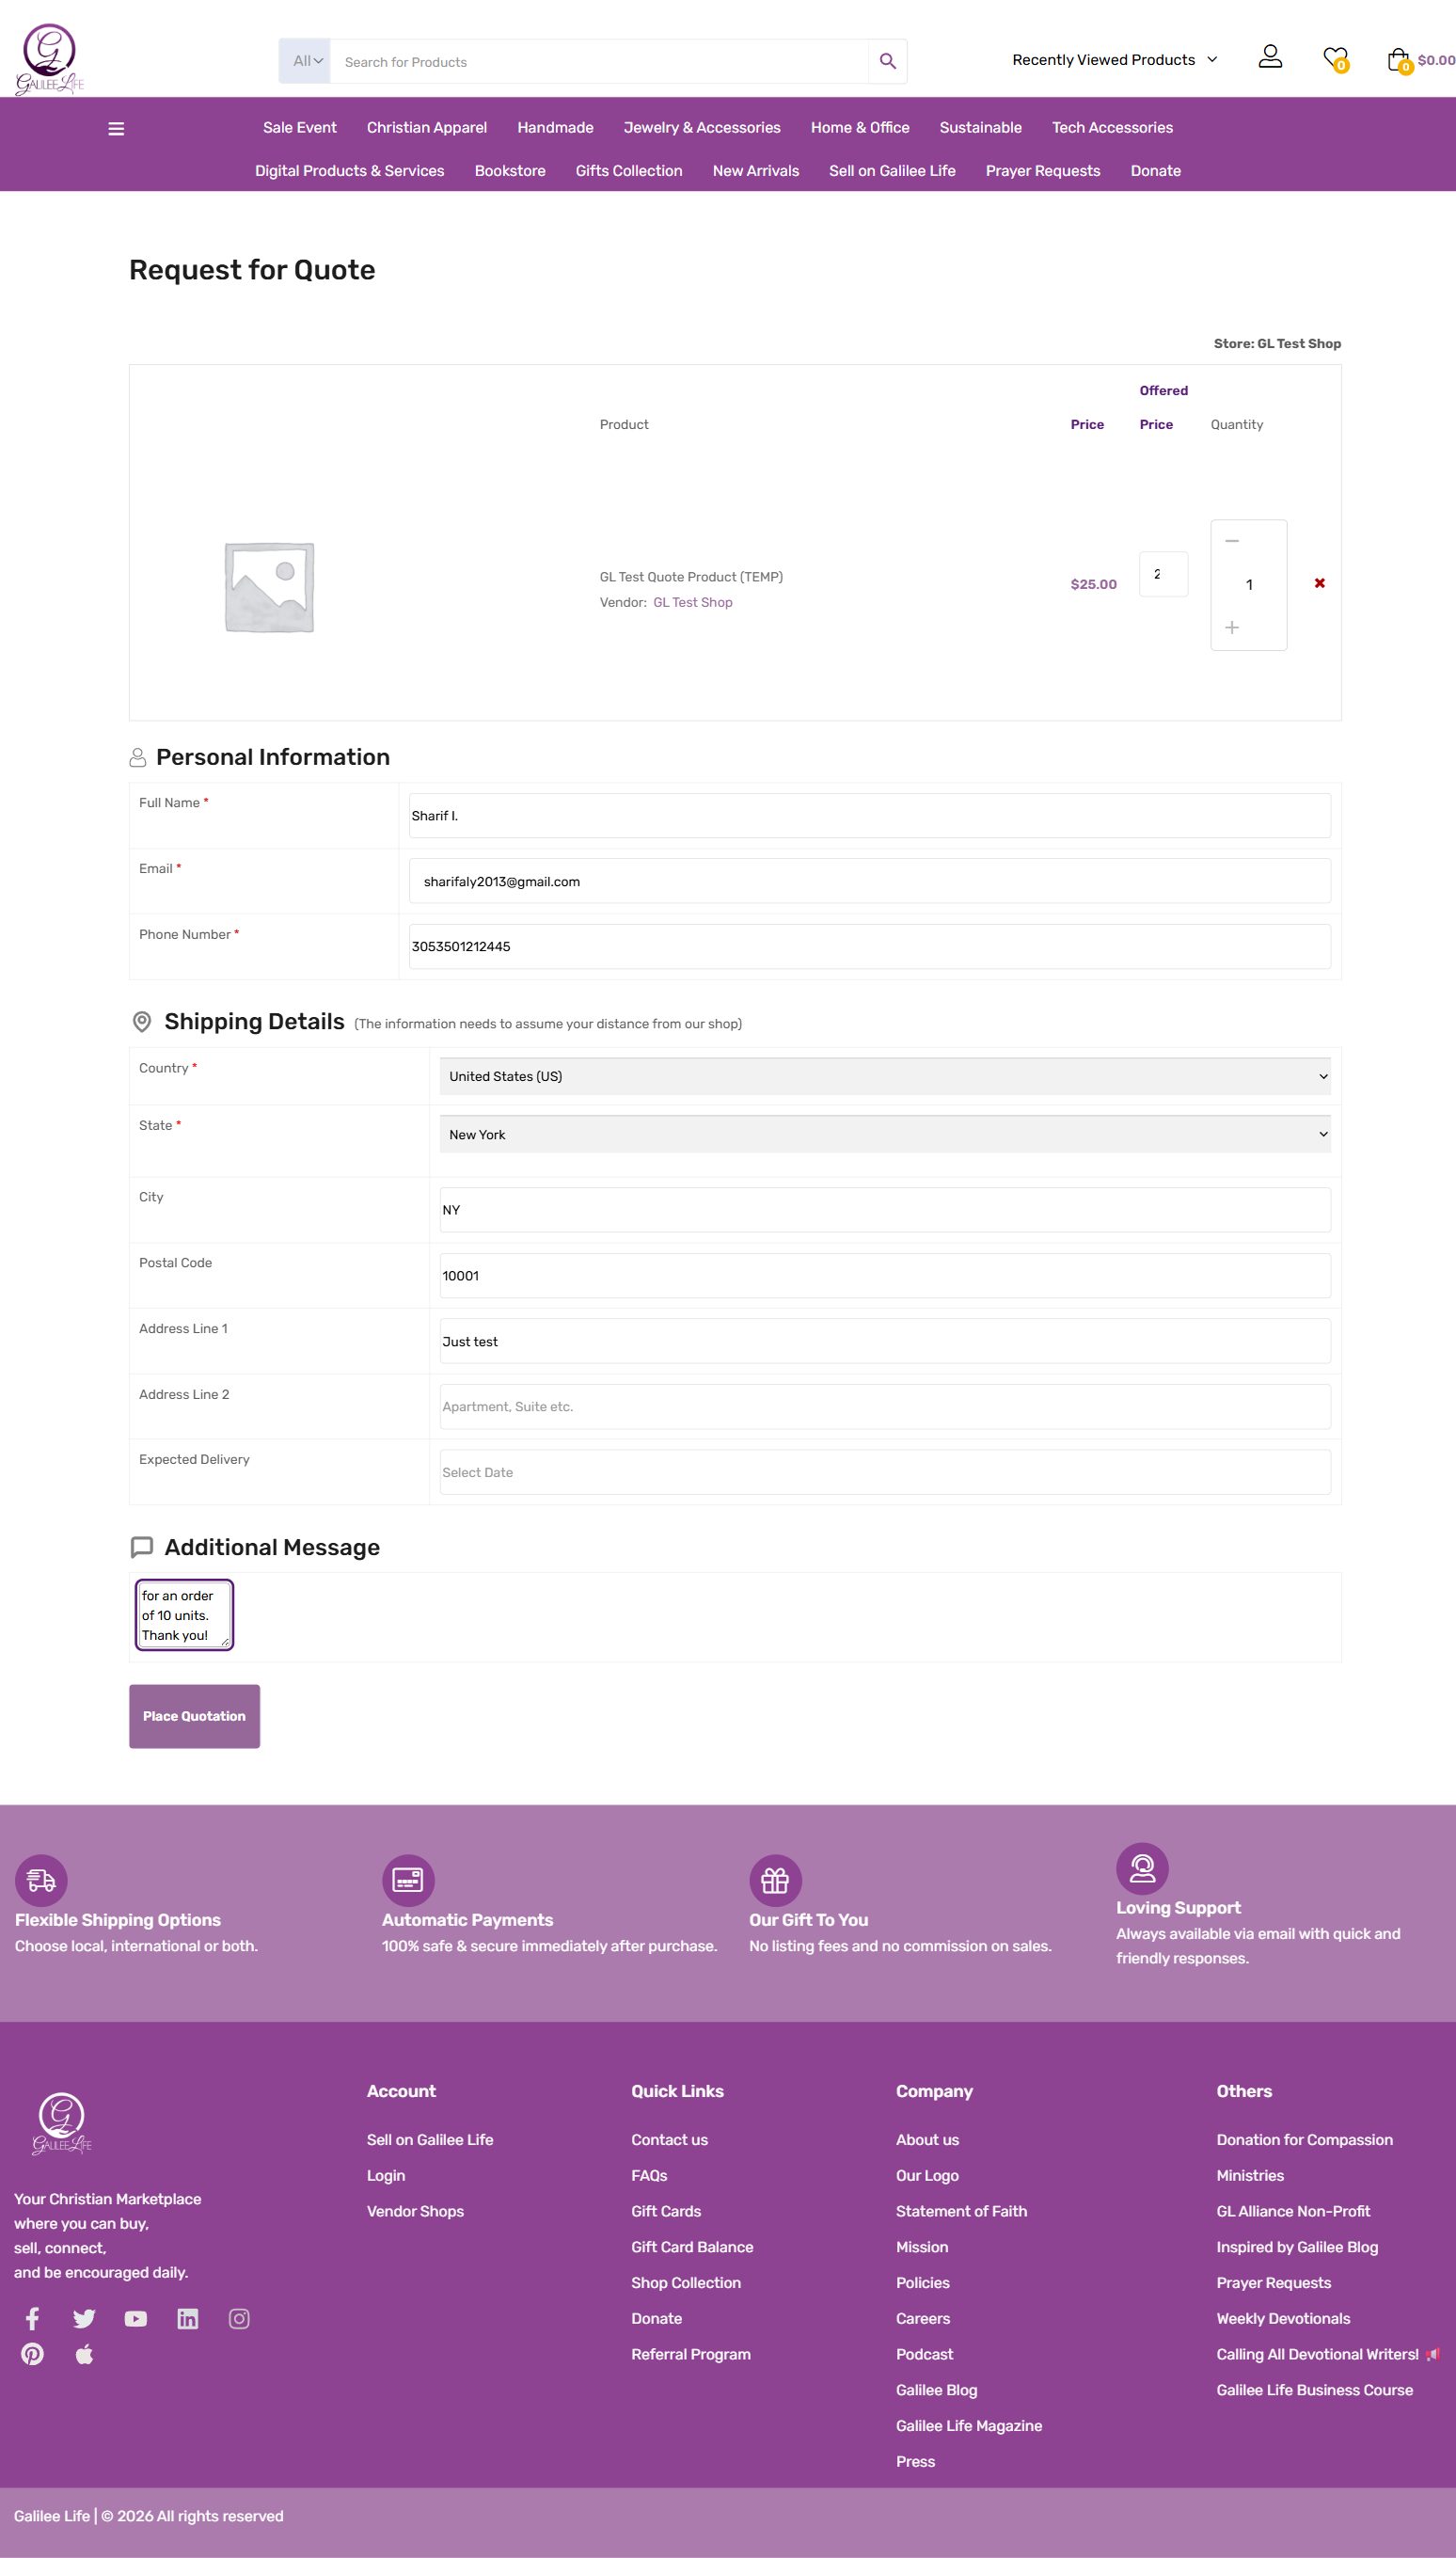
Step 2 — Customer fills out the quote form. After clicking the button, the customer is taken to a quote form. They enter their shipping address, the quantity they want, a message explaining what they need, and any other details.
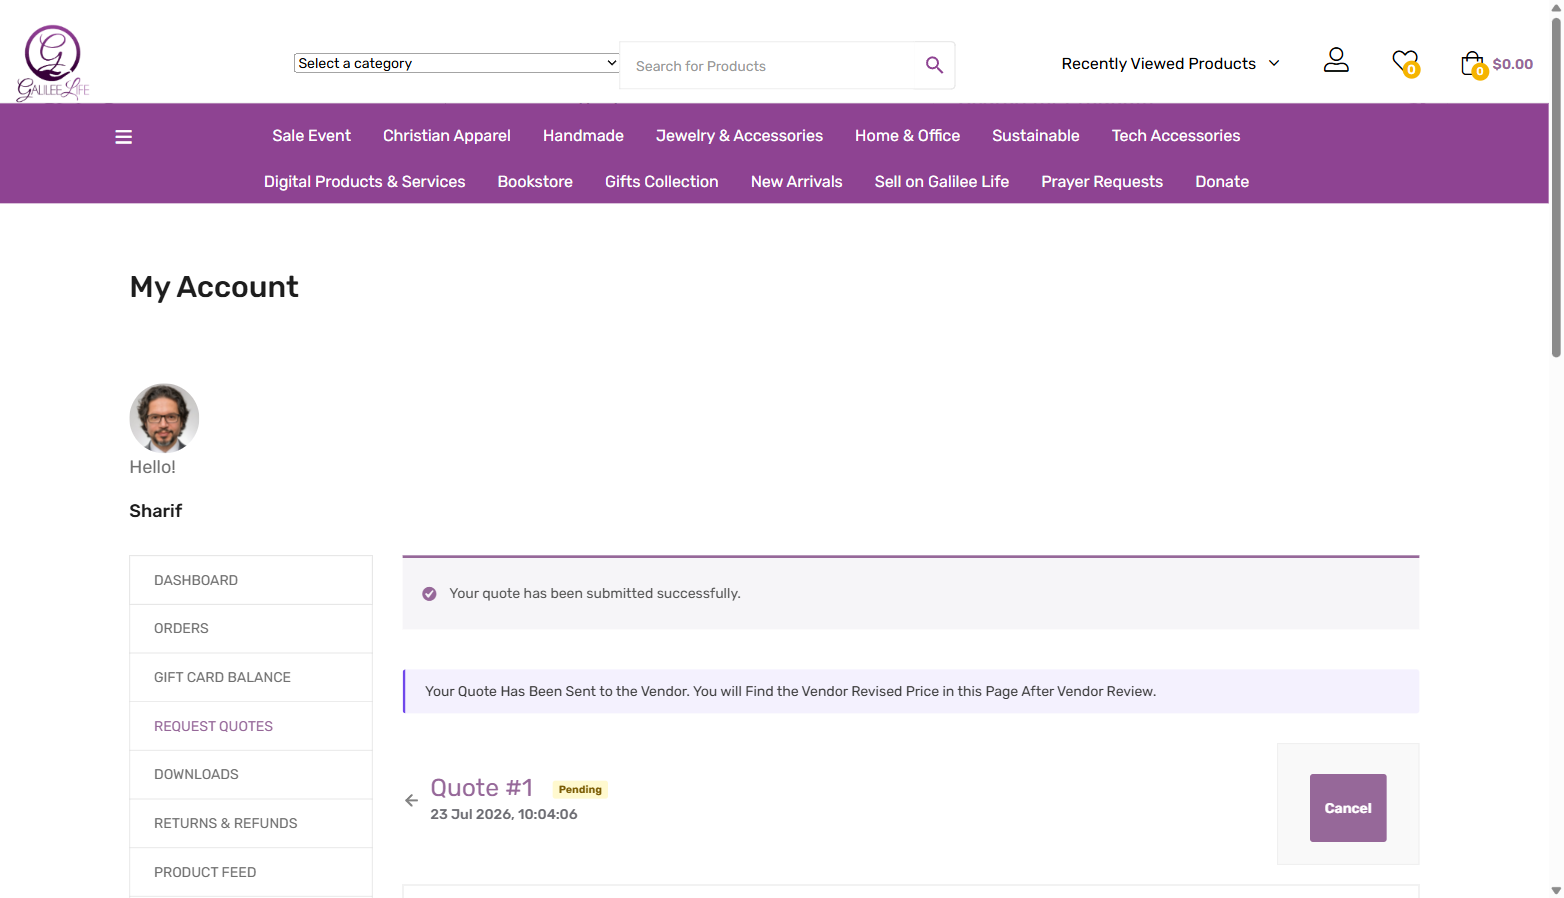
Step 3 — Customer submits and receives a confirmation. After submitting, the customer sees a confirmation page with a quote number. The quote is now in your inbox.
Part B: What You Do as the Vendor
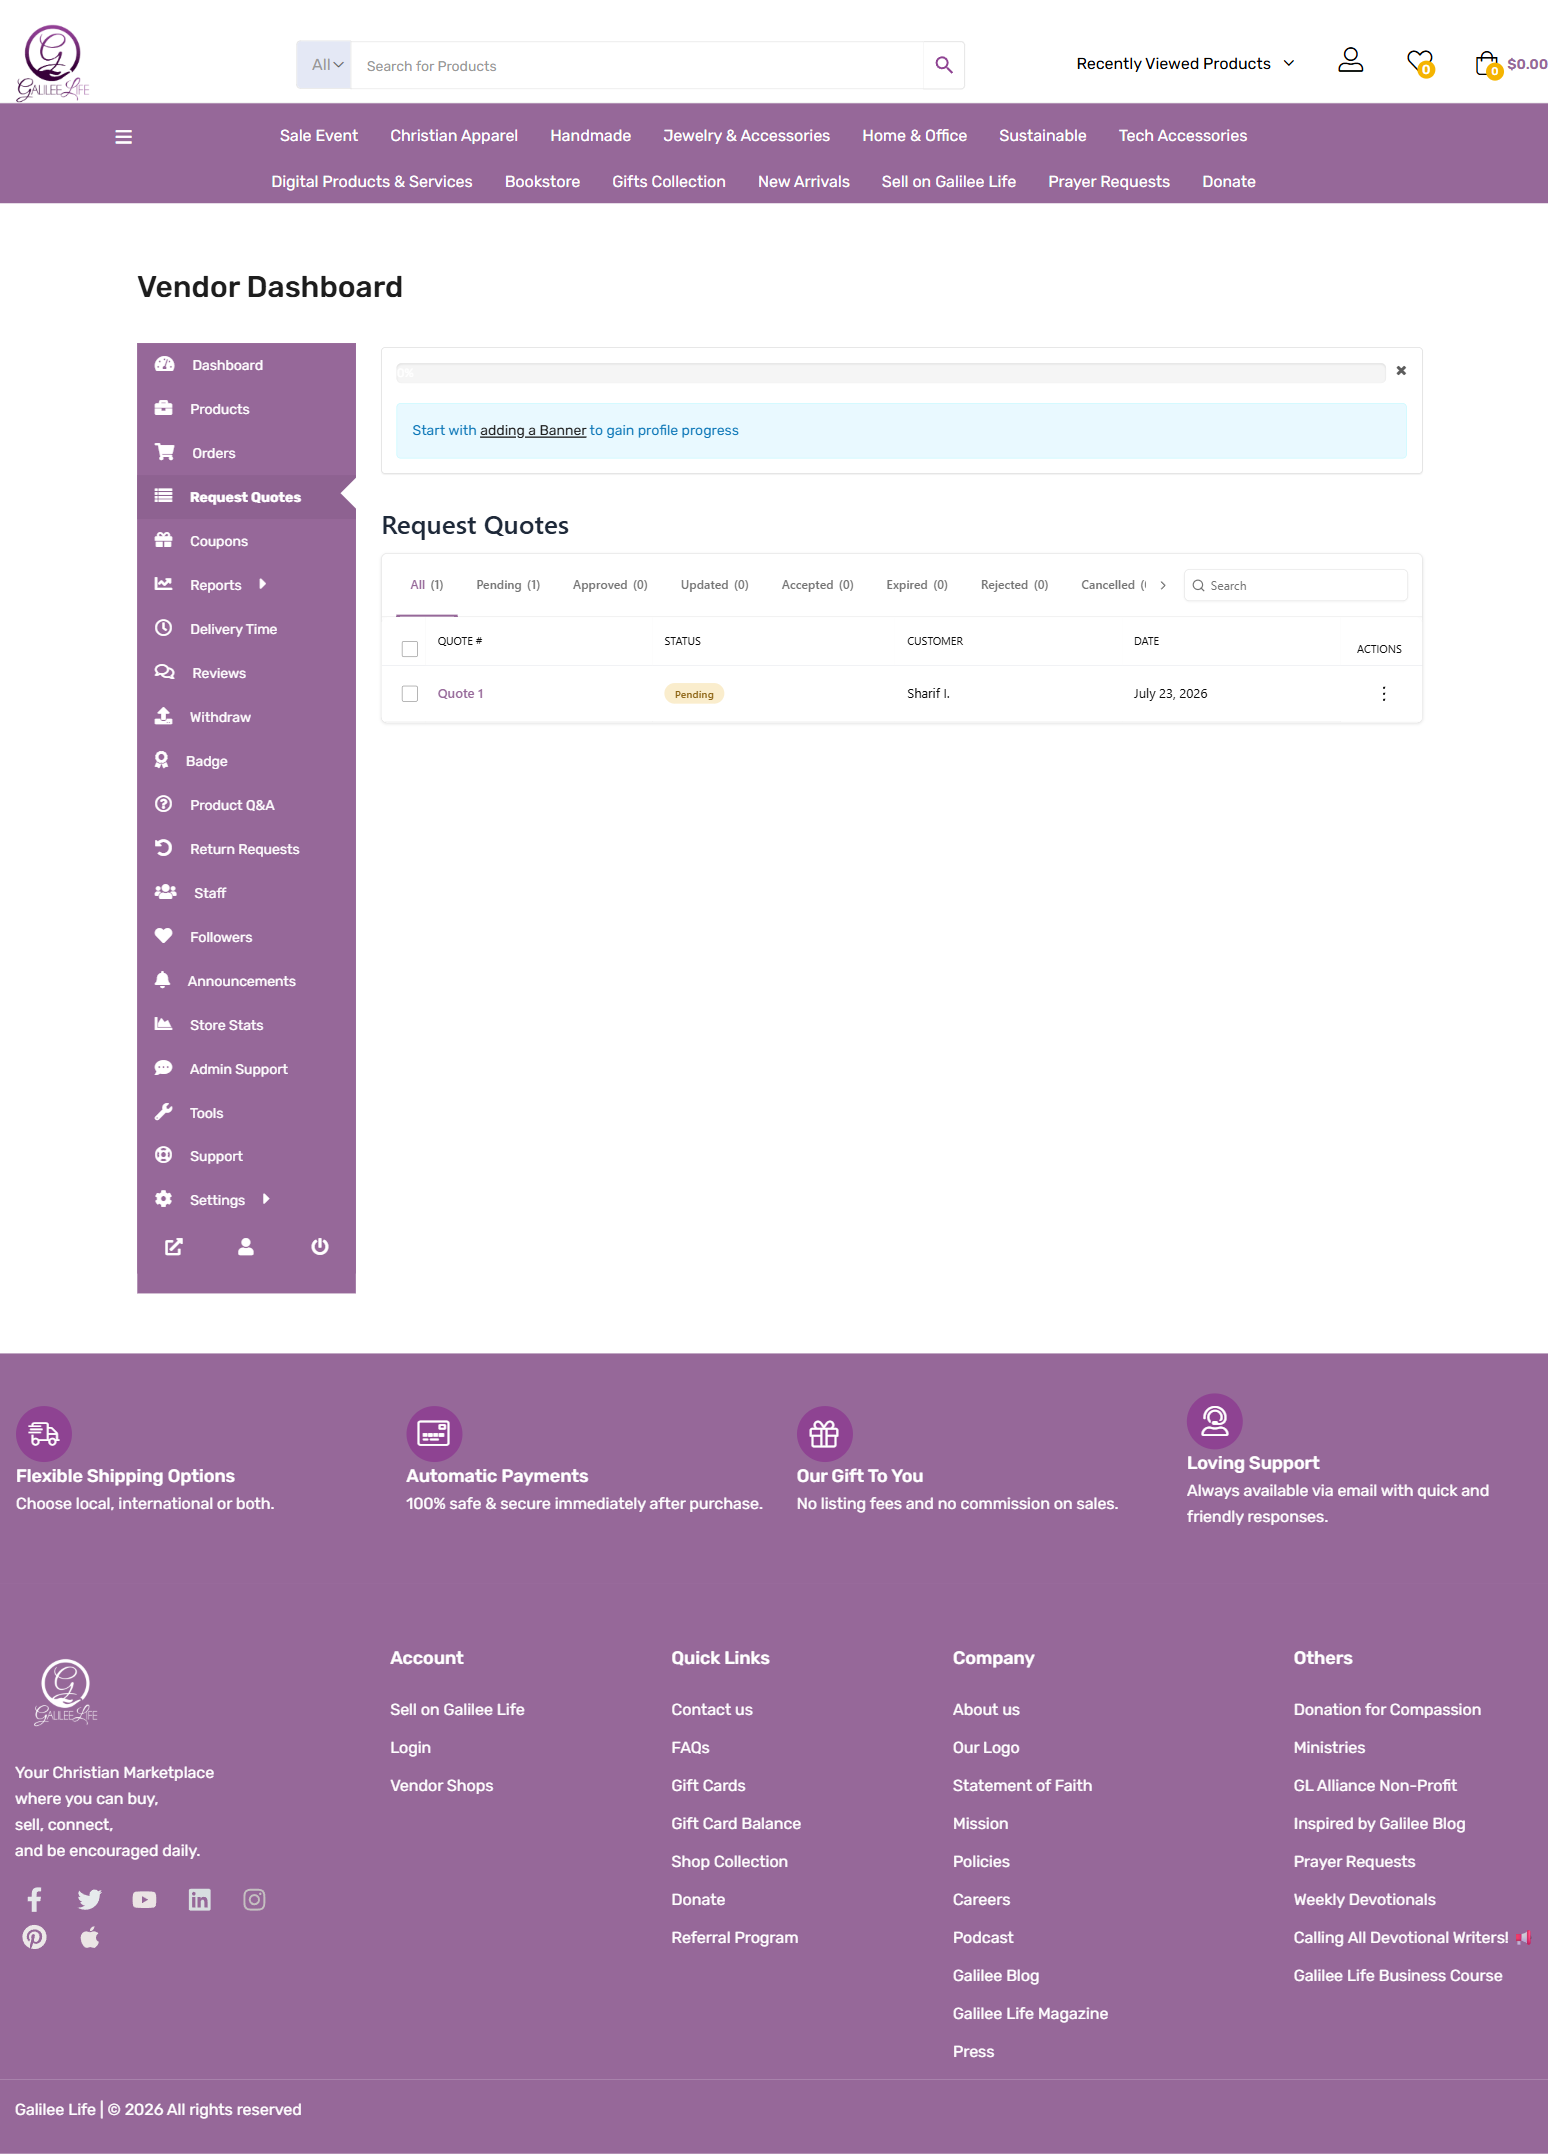
Step 4 — You see the quote in your dashboard. Go to Request Quotes in your vendor dashboard sidebar. You will see a list of all quotes from customers. New quotes show a “Pending” status.
Step 5 — You open the quote to see the customer’s request. Click the quote number to open it. You see the product, the customer’s offered price, their shipping address, and their message explaining what they want.
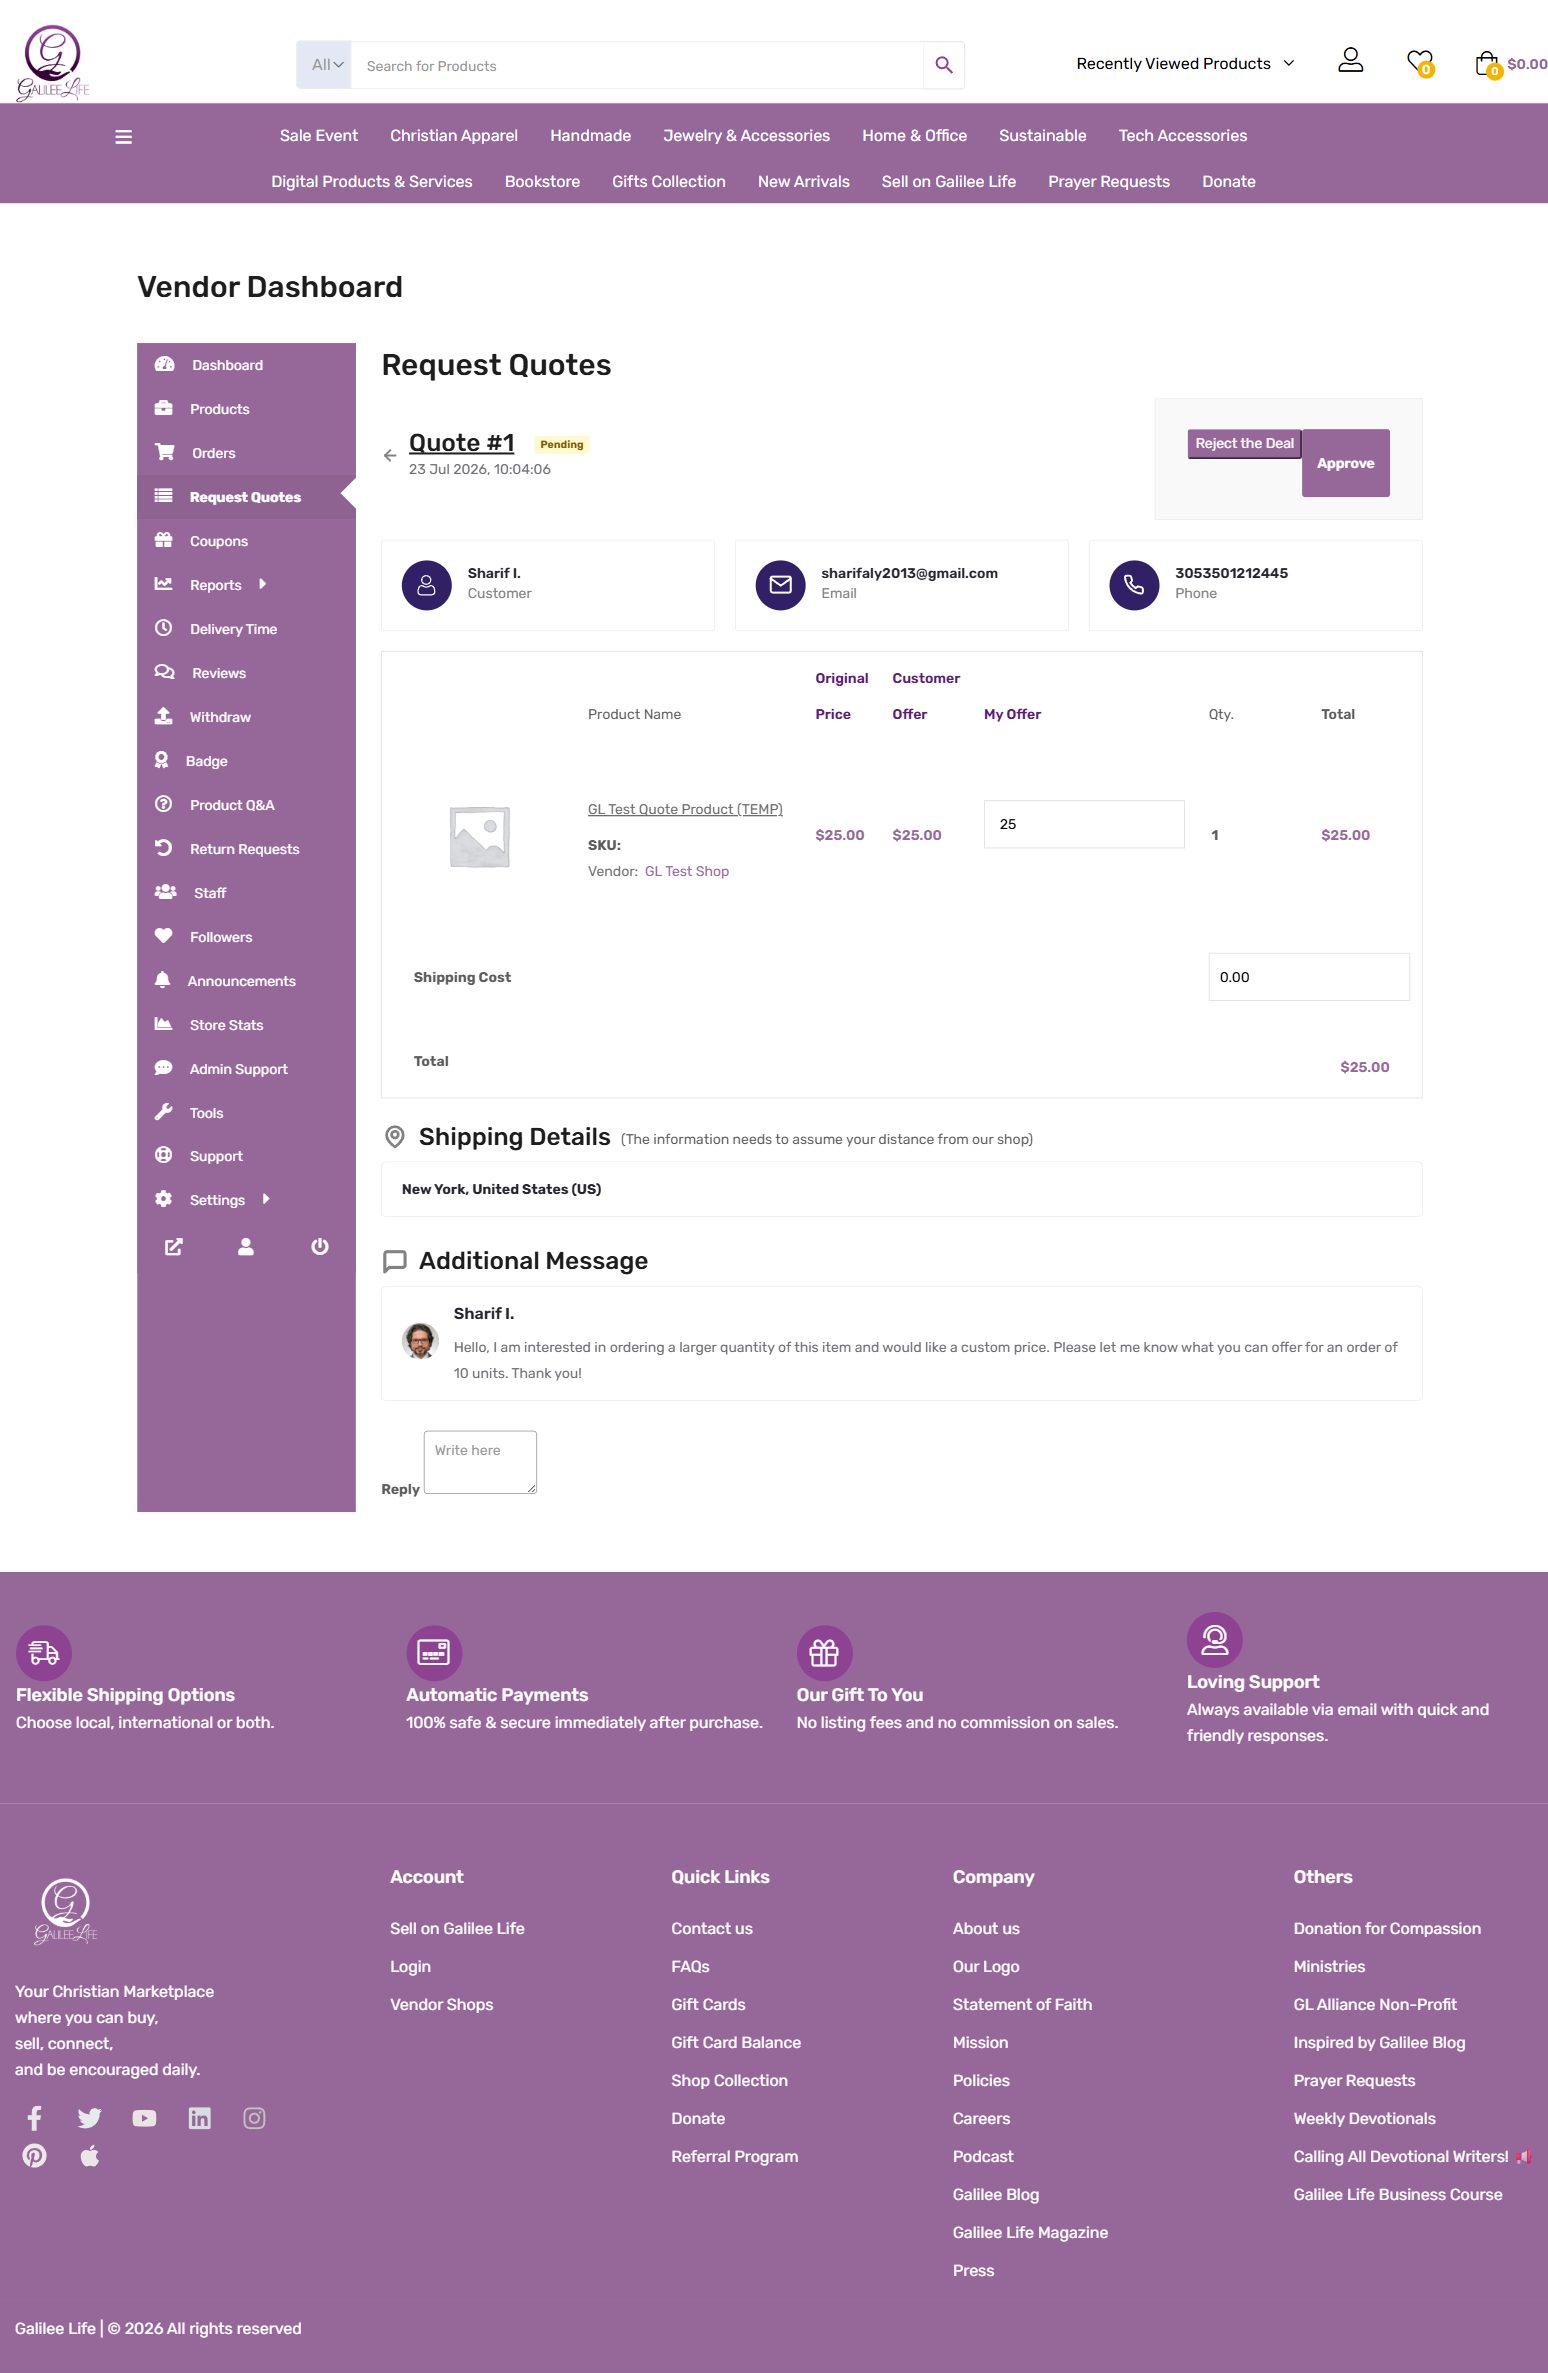
Step 6 — You enter your counter-offer price and reply. In the My Offer field, type the price you want to offer the customer. In the Reply box at the bottom, write a short message explaining your offer. Then click Update to send it.
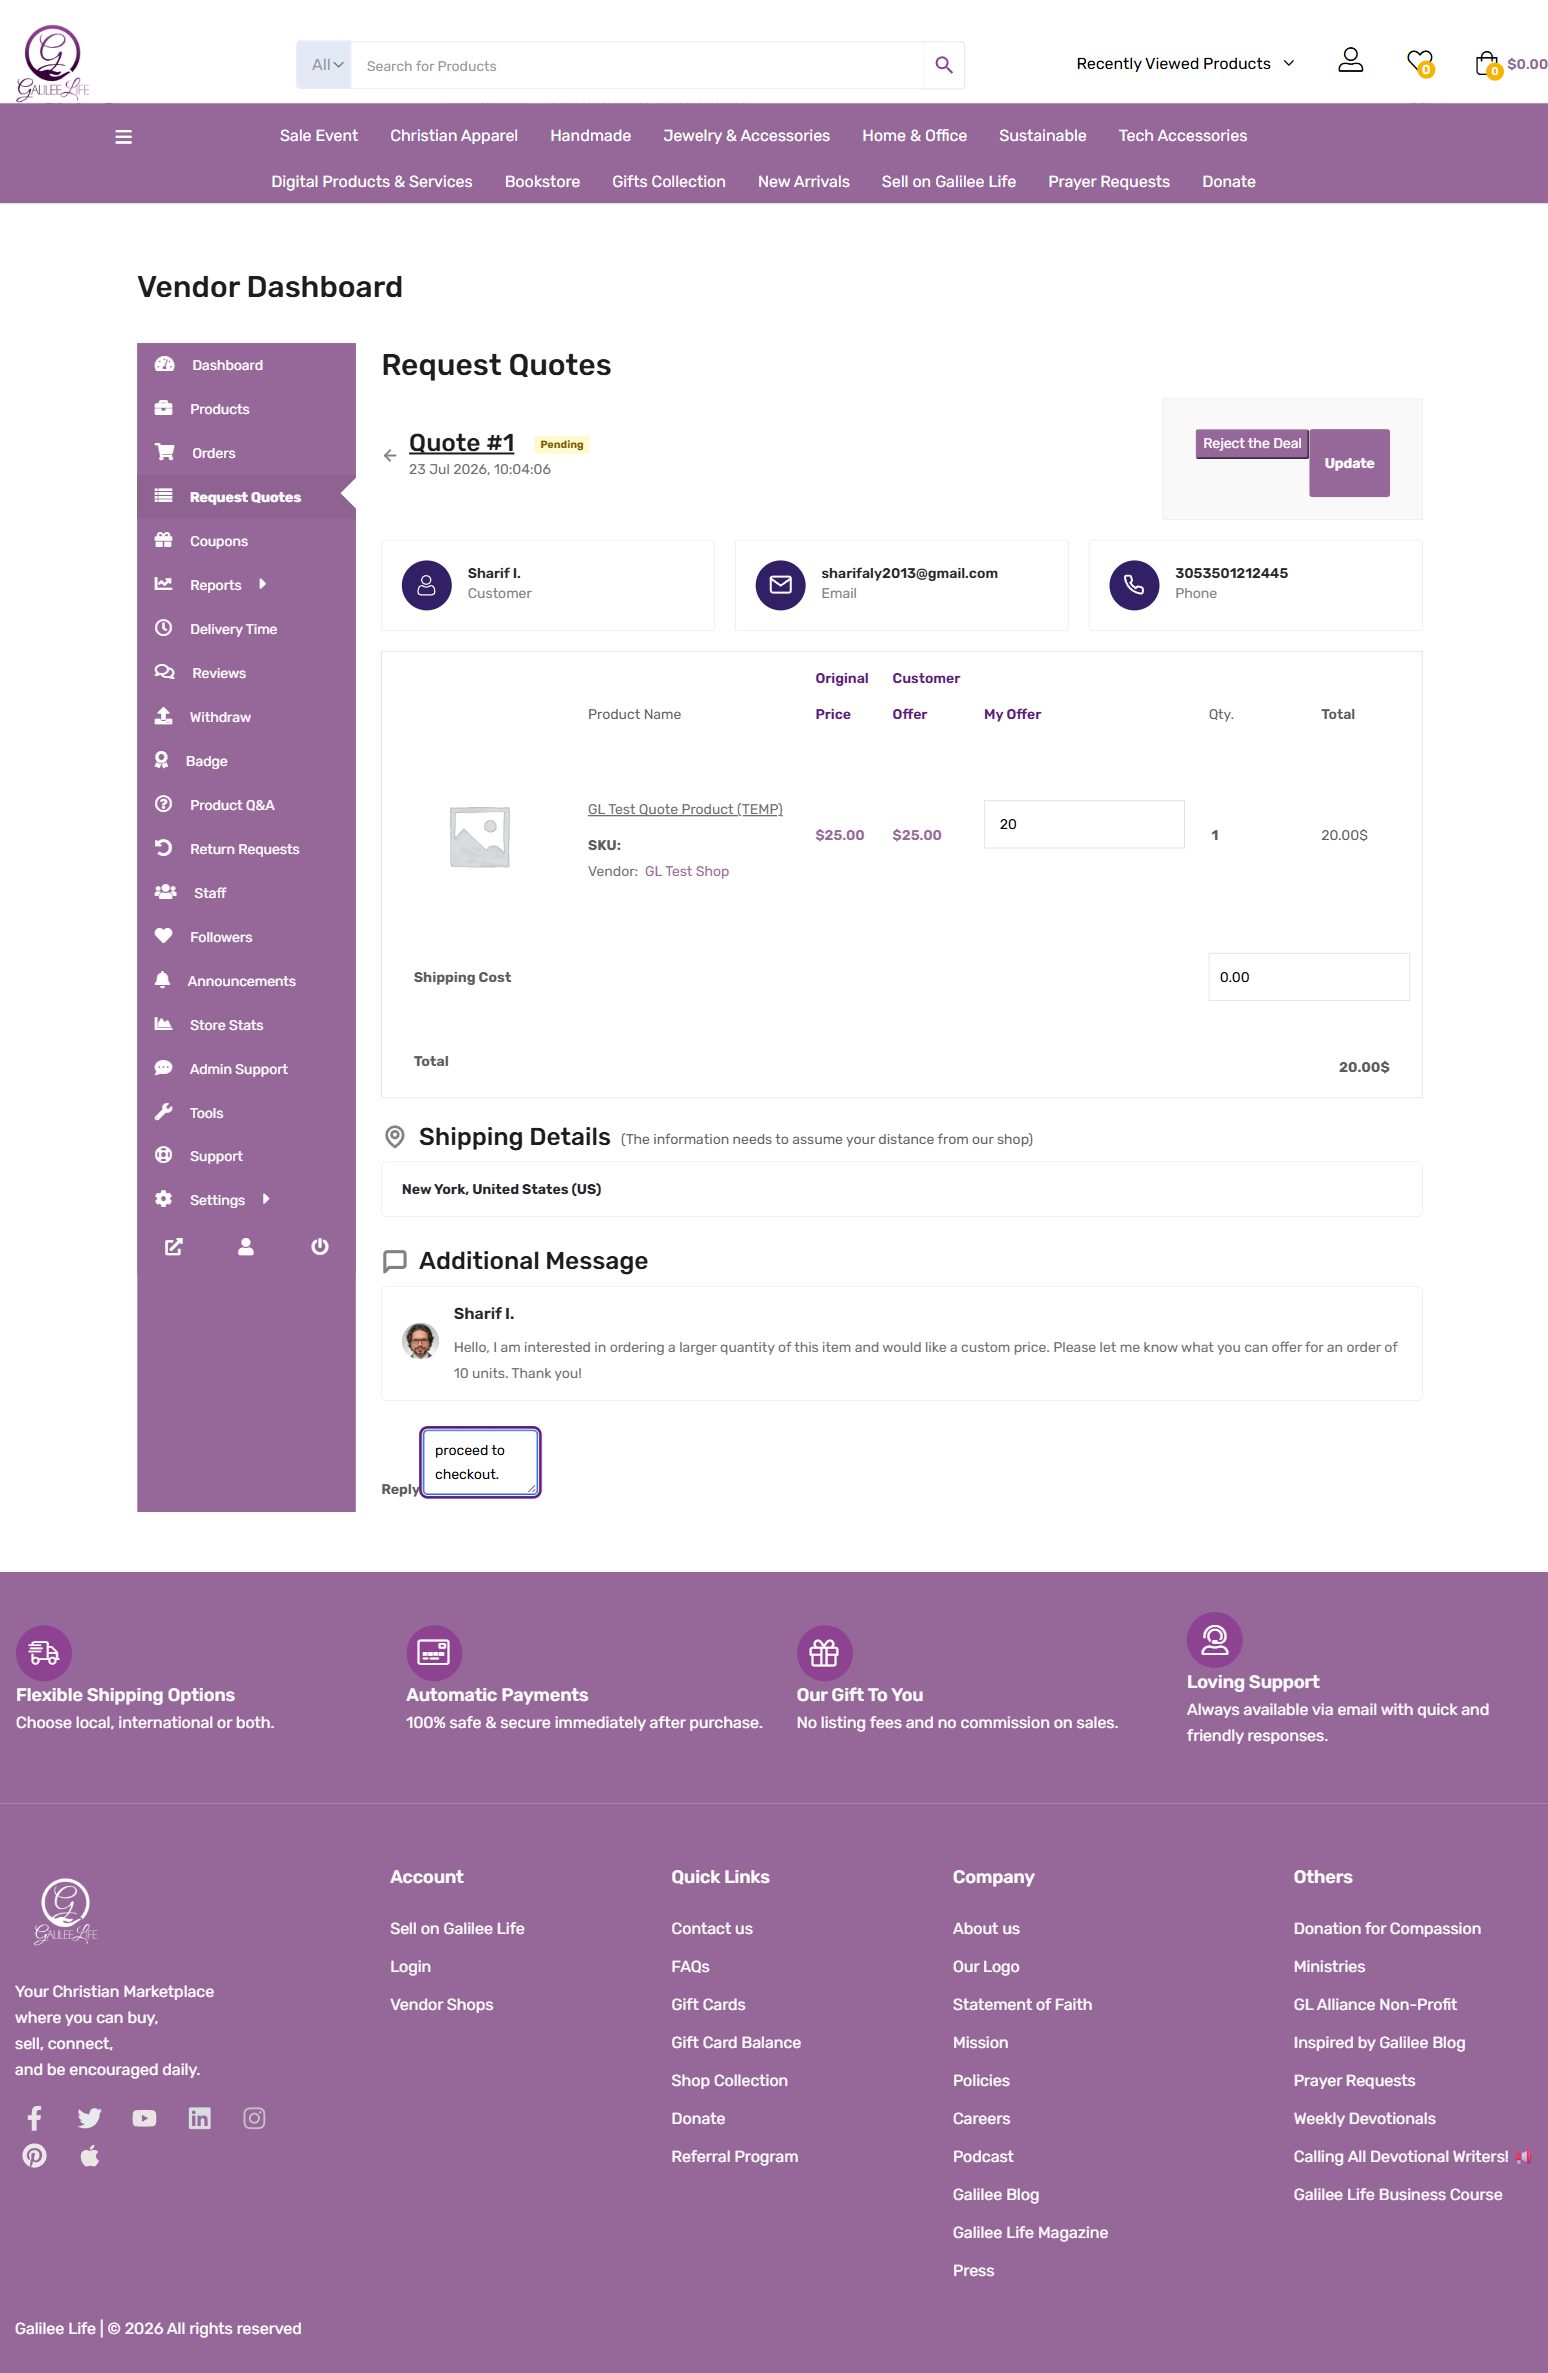
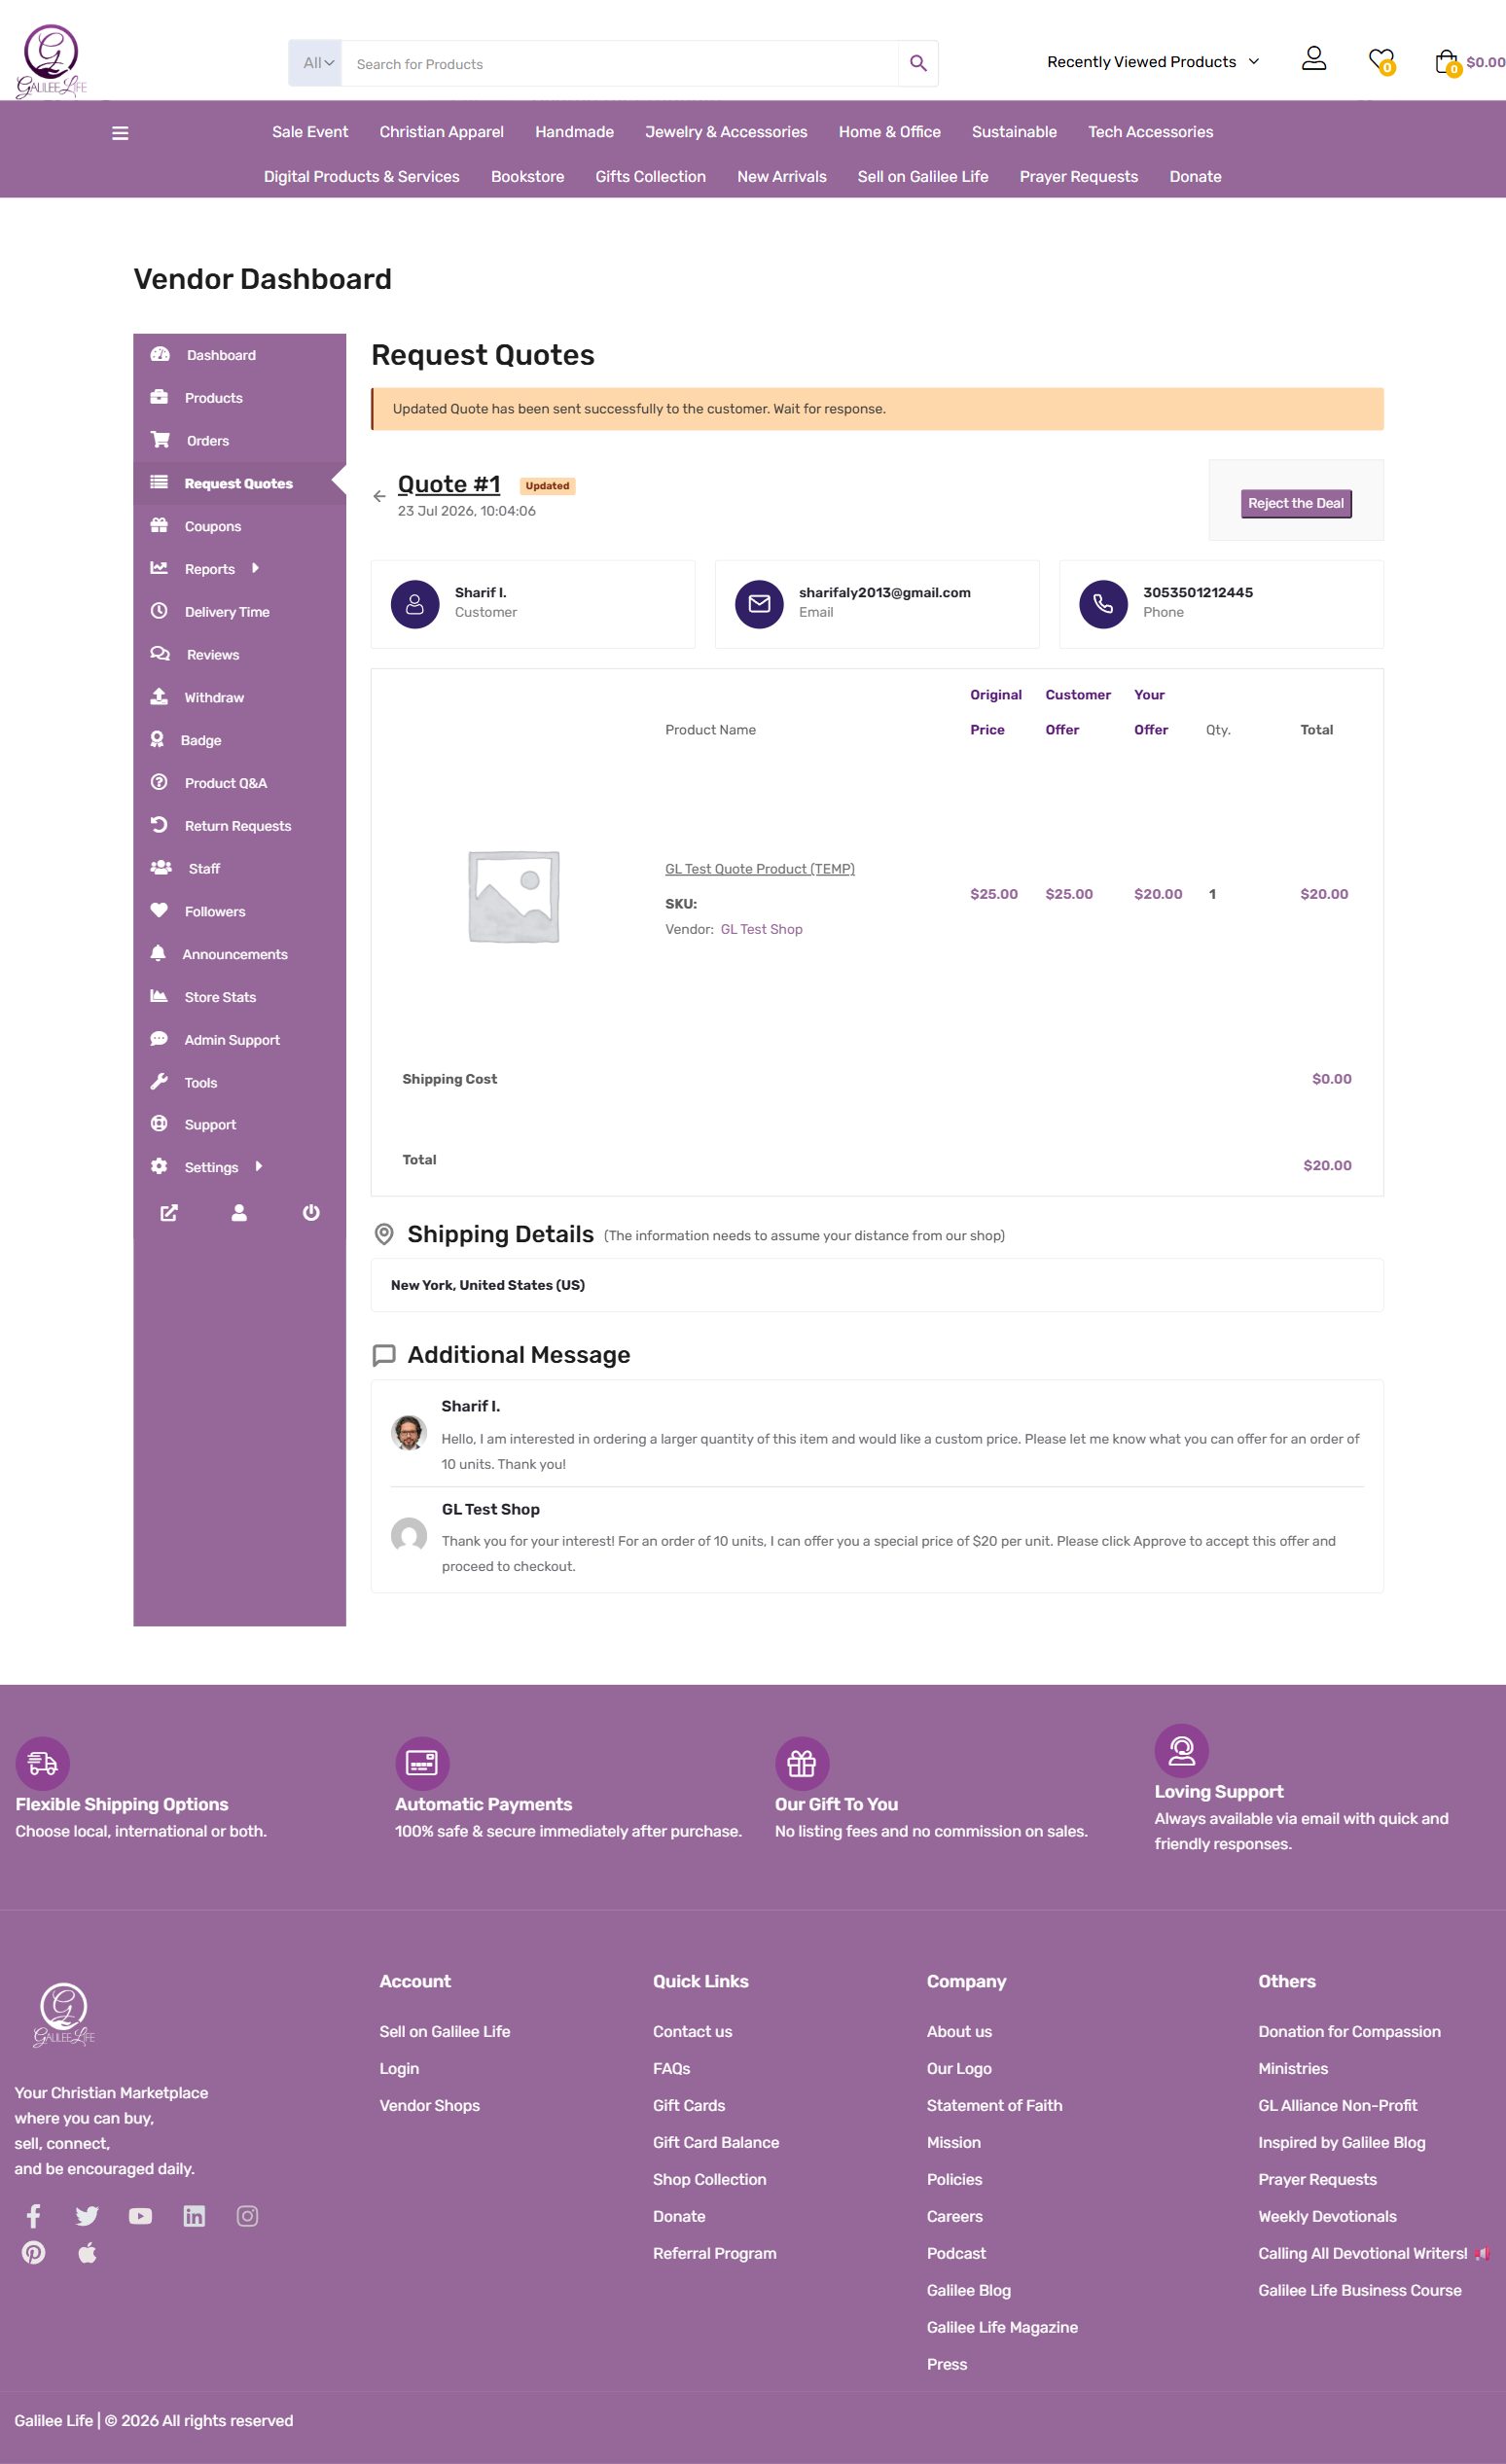
Step 7 — Your offer is sent to the customer. After clicking Update, the status changes to “Updated” and you see a confirmation that the quote was sent to the customer.
Part C: The Customer Responds
Step 8 — The customer sees your offer. The customer gets a notification that the quote was updated. They go to their account under Request Quotes and open the quote. They see the original price, the price they offered, and your counter-offer side by side. They also see your reply message.
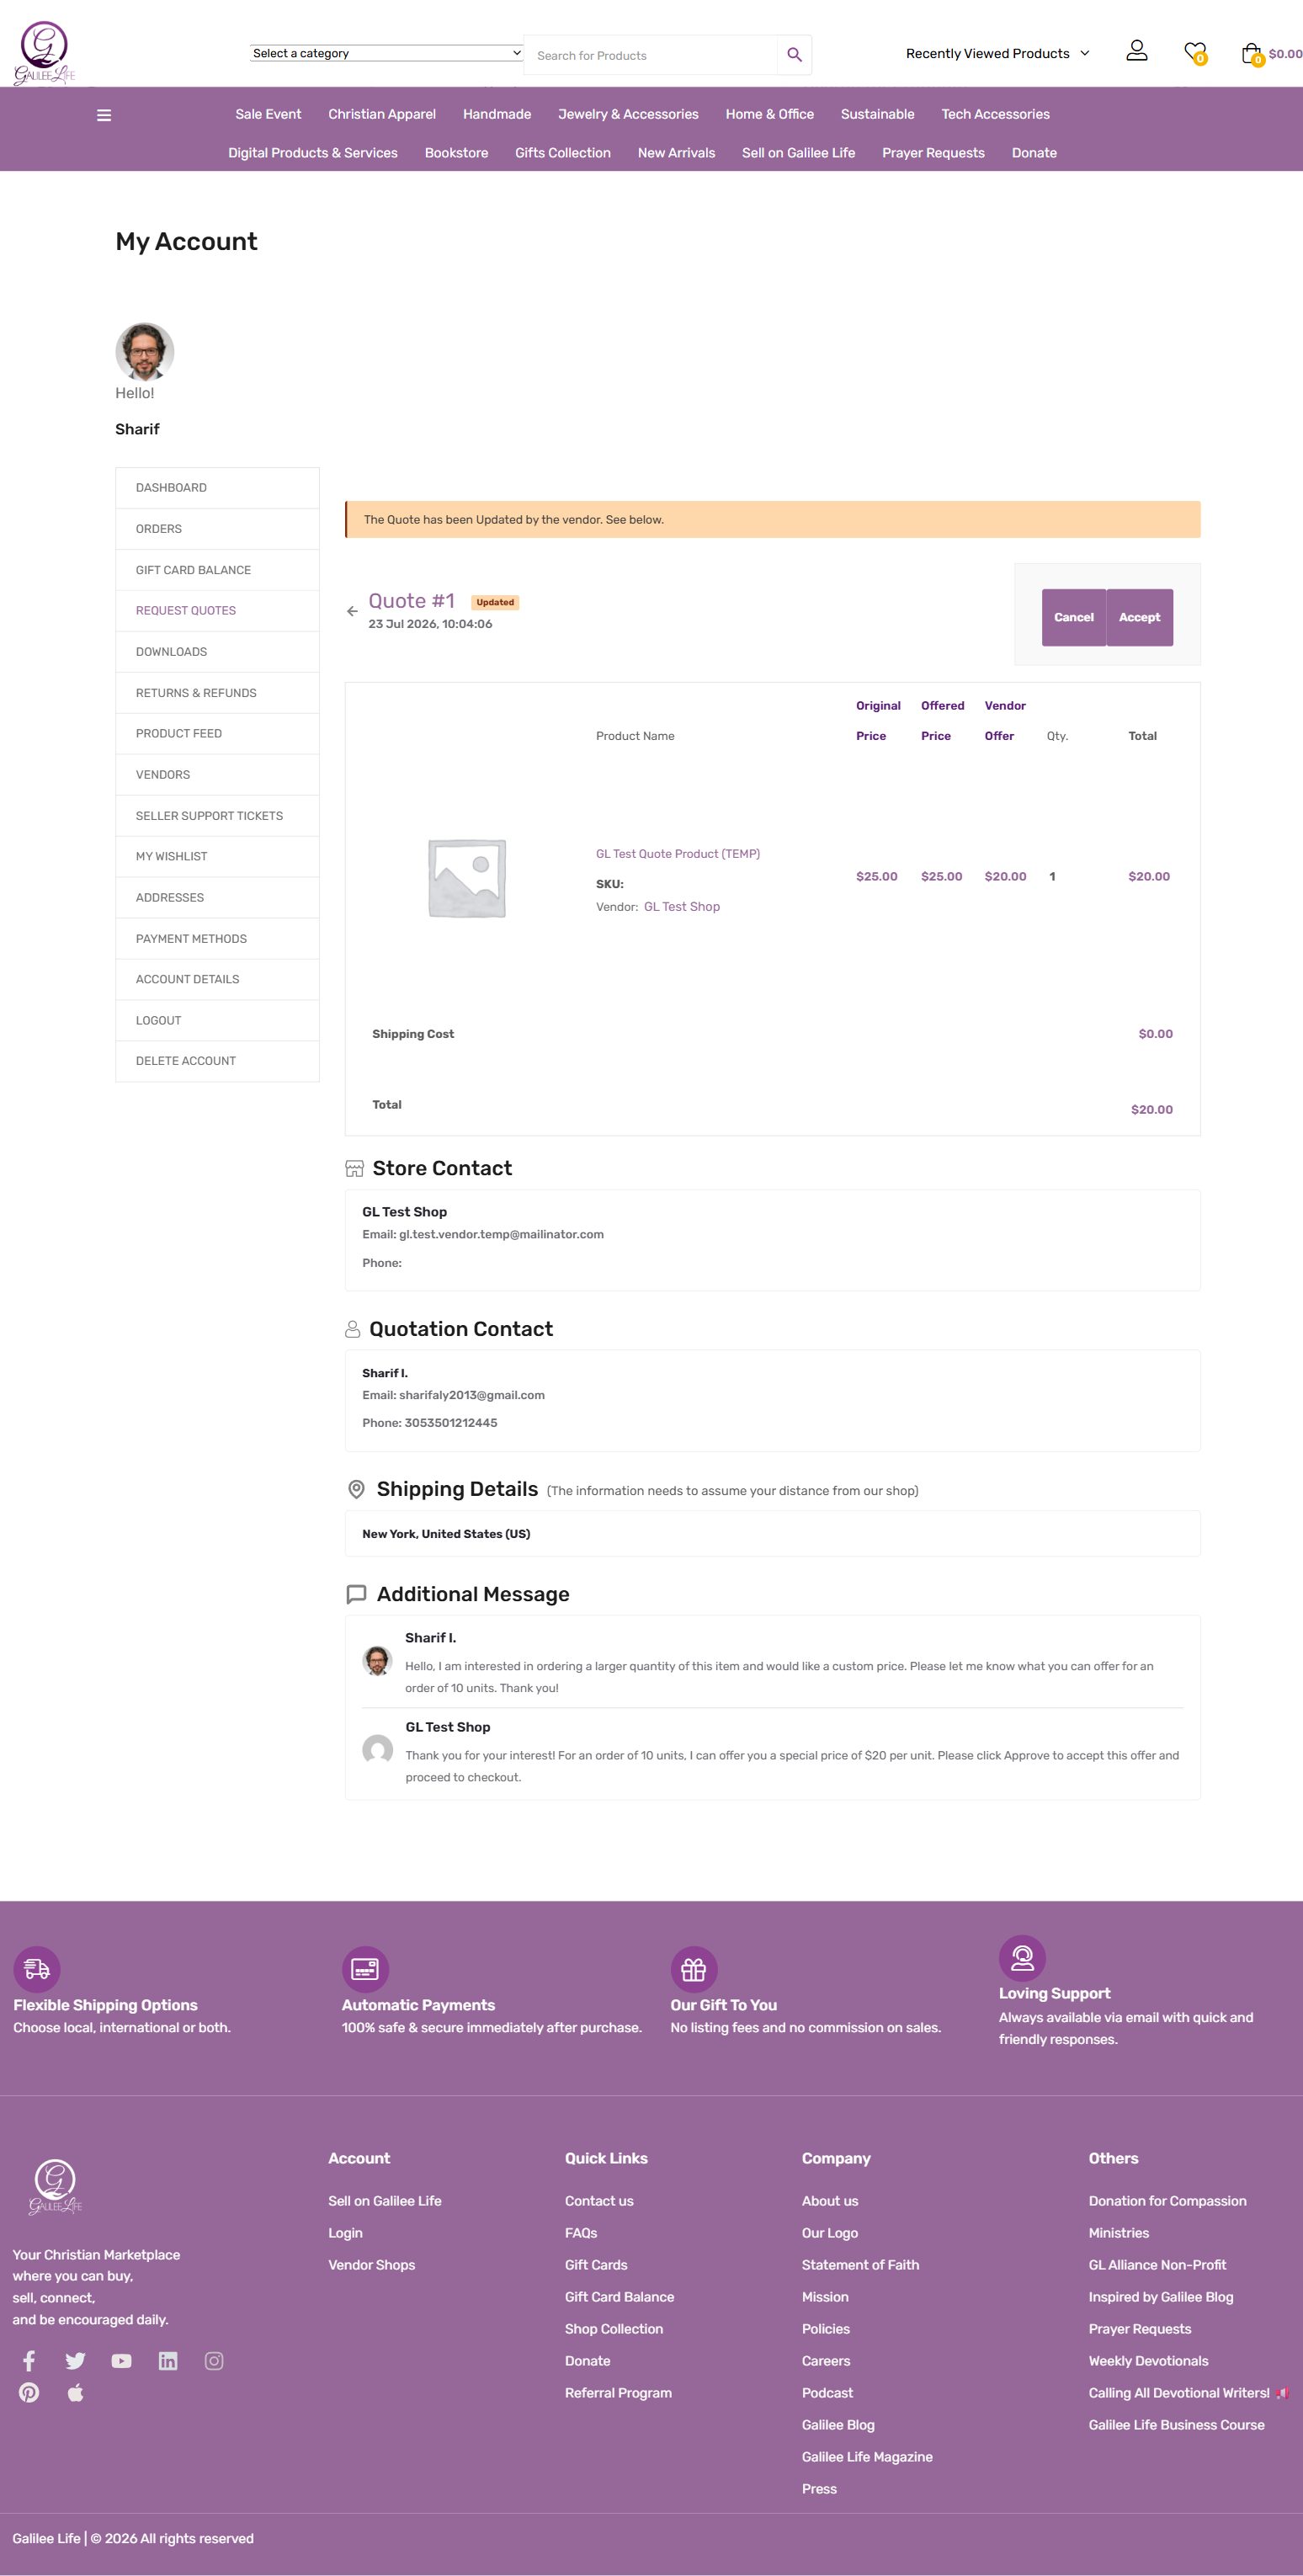
Step 9 — The customer accepts and the quote is complete. When the customer clicks Accept, the quote status changes to “Accepted”. The negotiation is complete and the customer can proceed to purchase at the agreed price.
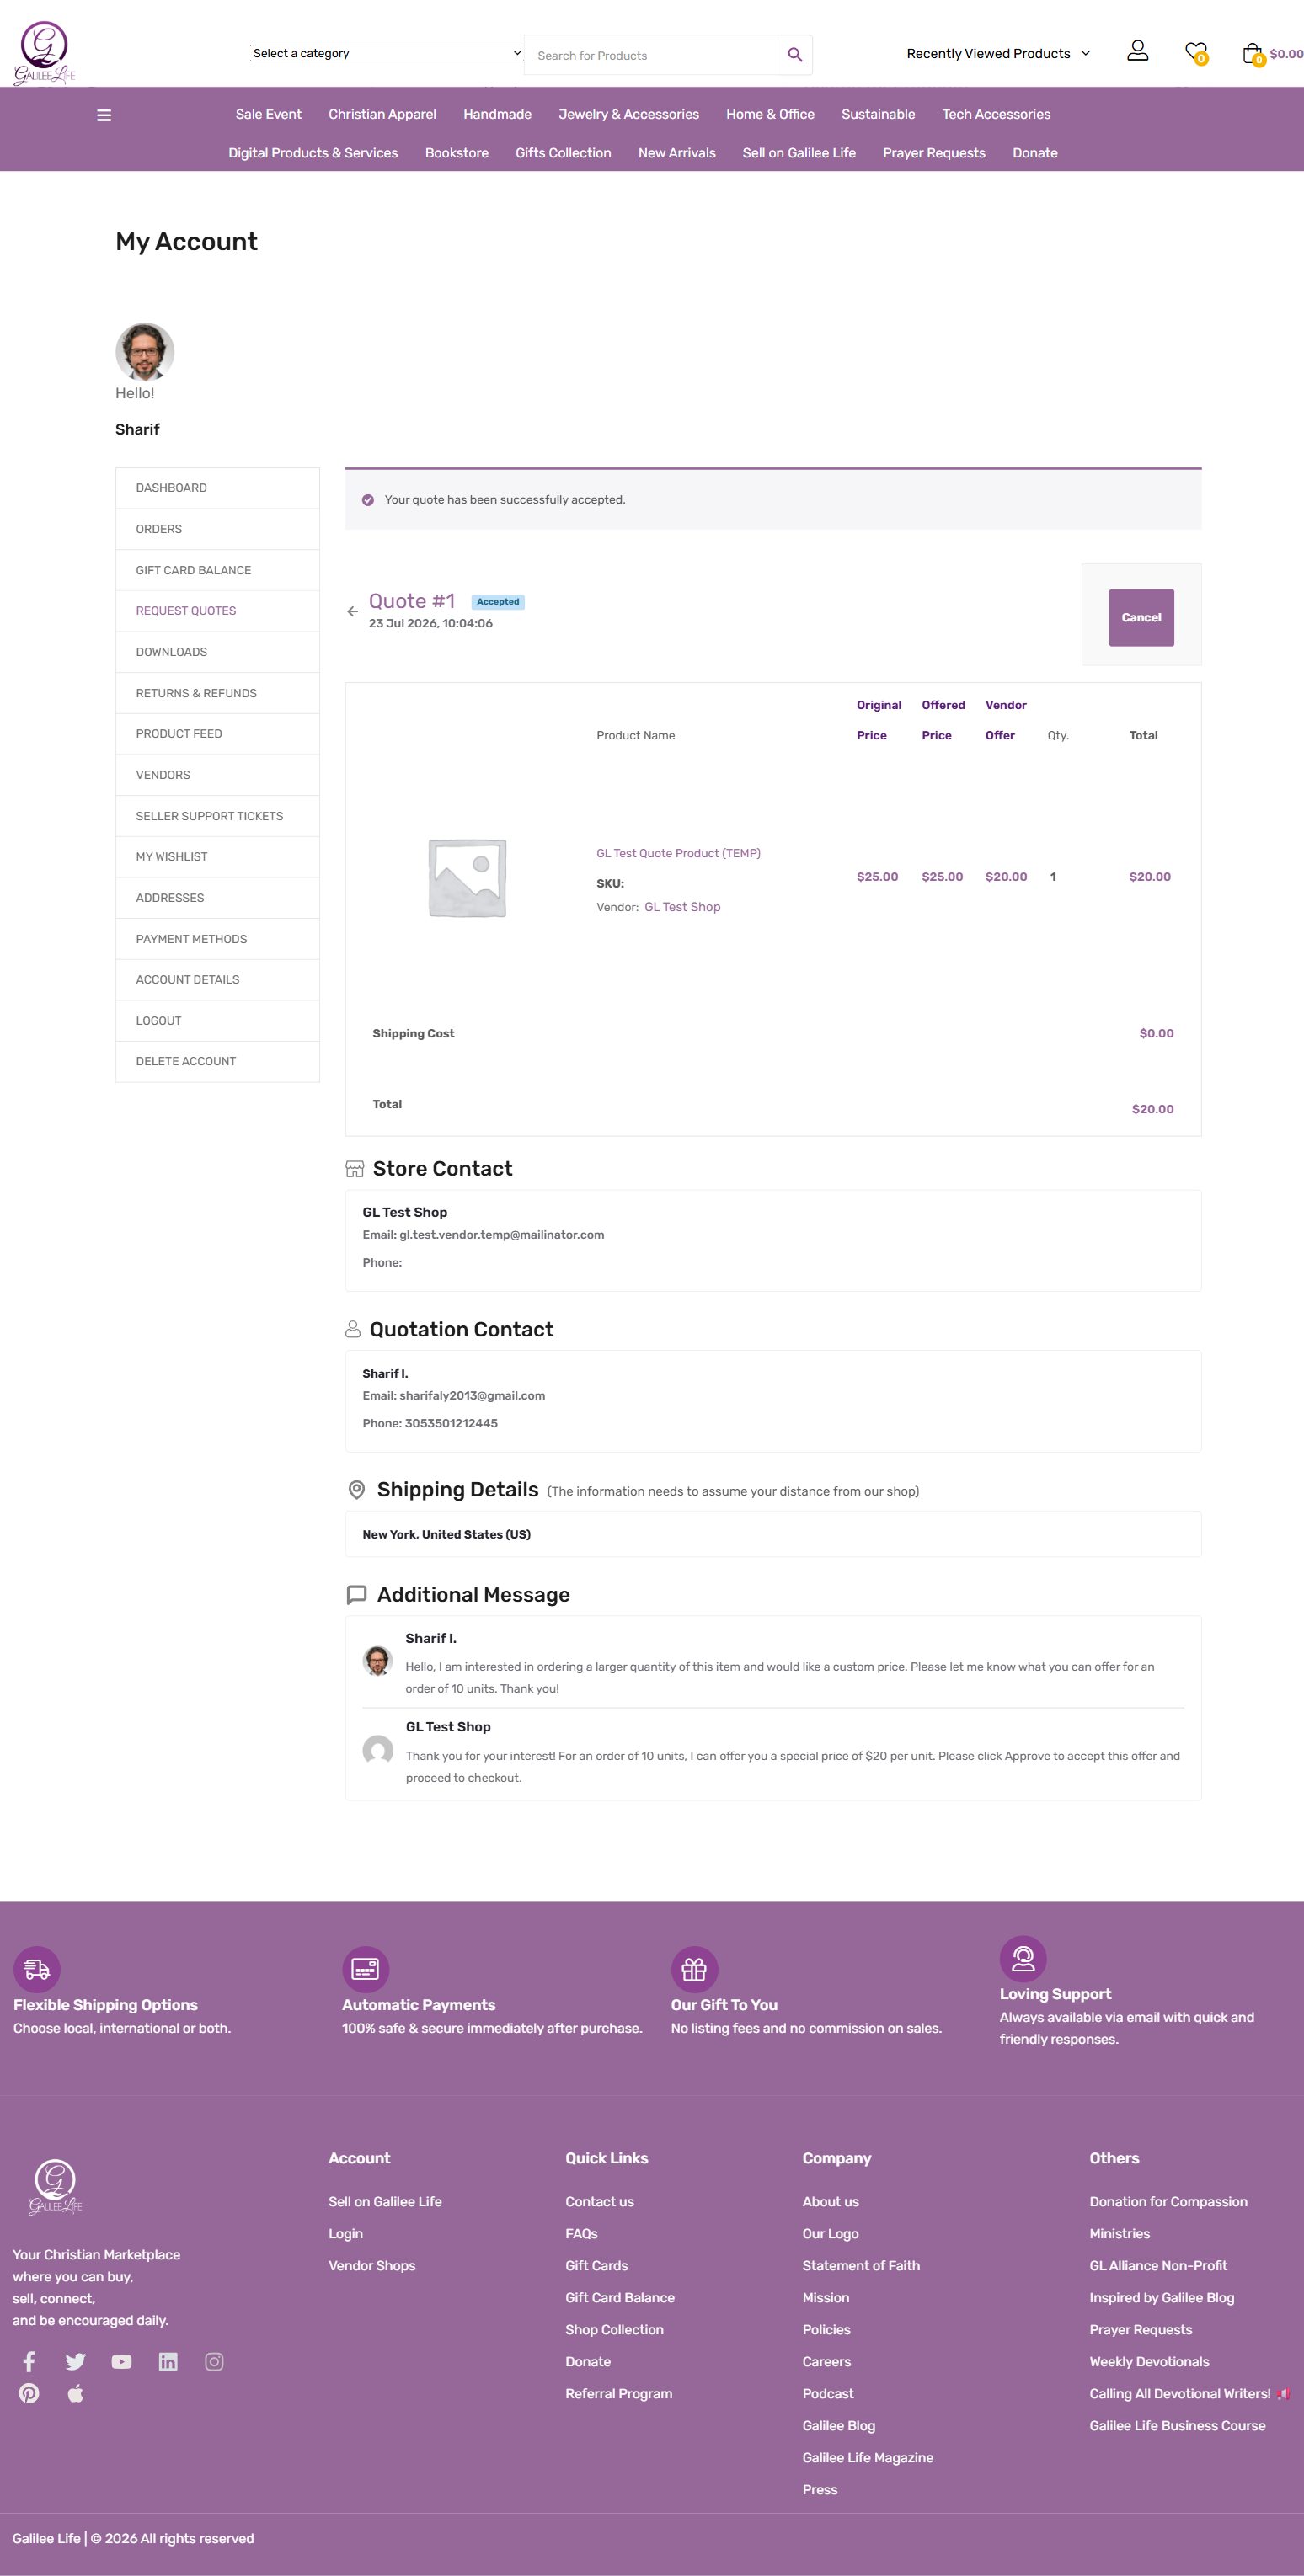
Tip: If a customer’s offer is too low, you can go back and forth by updating your offer again. You can also reject a quote entirely using the Reject the Deal button.
10. Advertise a Product
What it is: A paid feature that gives one of your products a promoted spot on the marketplace for a set number of days. Advertised products get extra visibility to shoppers browsing the site.
What it costs: You choose how long you want the advertisement to run. Each length has its own price:
- 1 day — $1.00
- 1 week — $7.00
- 2 weeks — $14.00
- 1 month — $30.00
There is no separate signup or subscription. You pay once per advertisement, only for the length you pick.
Step 1: Open the product and choose a length
- Go to Products in the left menu and open the product you want to advertise. The product must already be published (not a draft).
- Scroll down to the Advertise Product section near the bottom of the page.
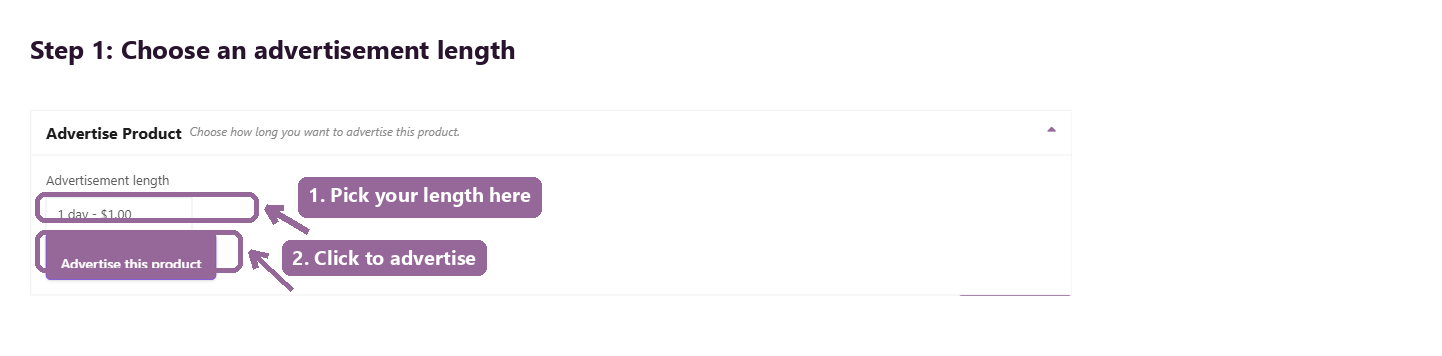
- Use the Advertisement length dropdown to pick 1 day, 1 week, 2 weeks, or 1 month. The price for each choice is shown right in the dropdown, so you always know the cost before you click anything.
- Click Advertise this product.
Step 2 (quick option): The megaphone icon in your product list
If you do not want to open the full product page, you can also start an advertisement straight from your product list. Look for the small purple megaphone icon next to each product’s status. Clicking it starts a 1 day / $1.00 advertisement right away, the fastest option if you just want a quick boost.
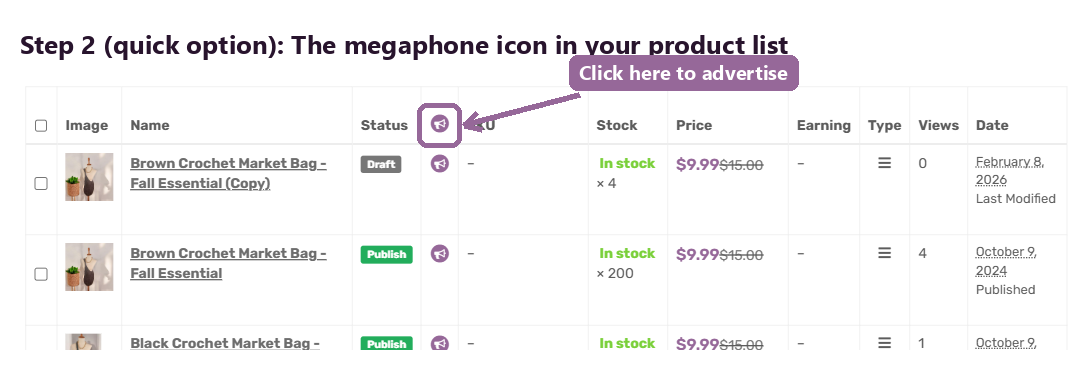
If you want a longer length than 1 day, use the full product page instead (Step 1), since the quick icon only offers the 1-day option.
Step 3: Confirm the length and price
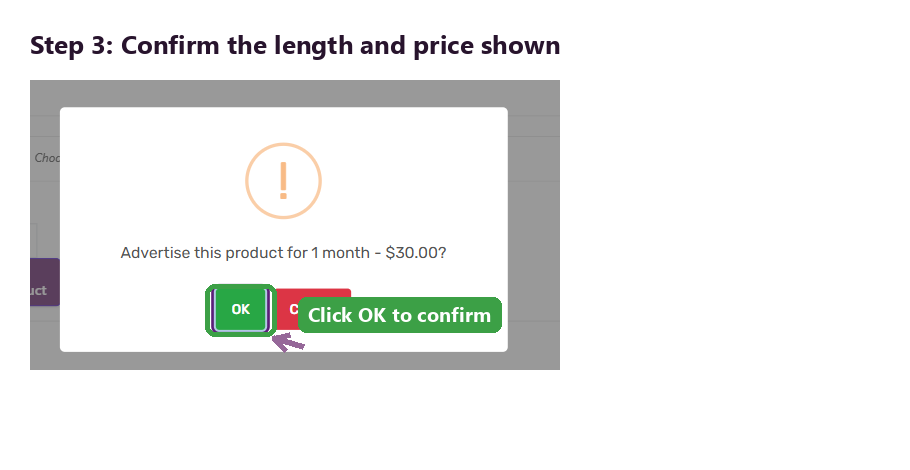
After you click, a confirmation box appears showing exactly what you are about to buy, for example “Advertise this product for 1 month – $30.00?” Check that the length and price match what you meant to choose, then click OK.
Step 4: Complete your purchase
Once you confirm, the advertisement charge is added to your cart automatically and your cart total in the top right of the site updates right away, with no need to reload the page. From there:
- Click the cart icon in the top right, or go to Cart.
- Review the “Product Advertisement Payment” line, which shows your product name and how many days it will run.
- Click Proceed to checkout and complete payment the same way you would for any purchase.
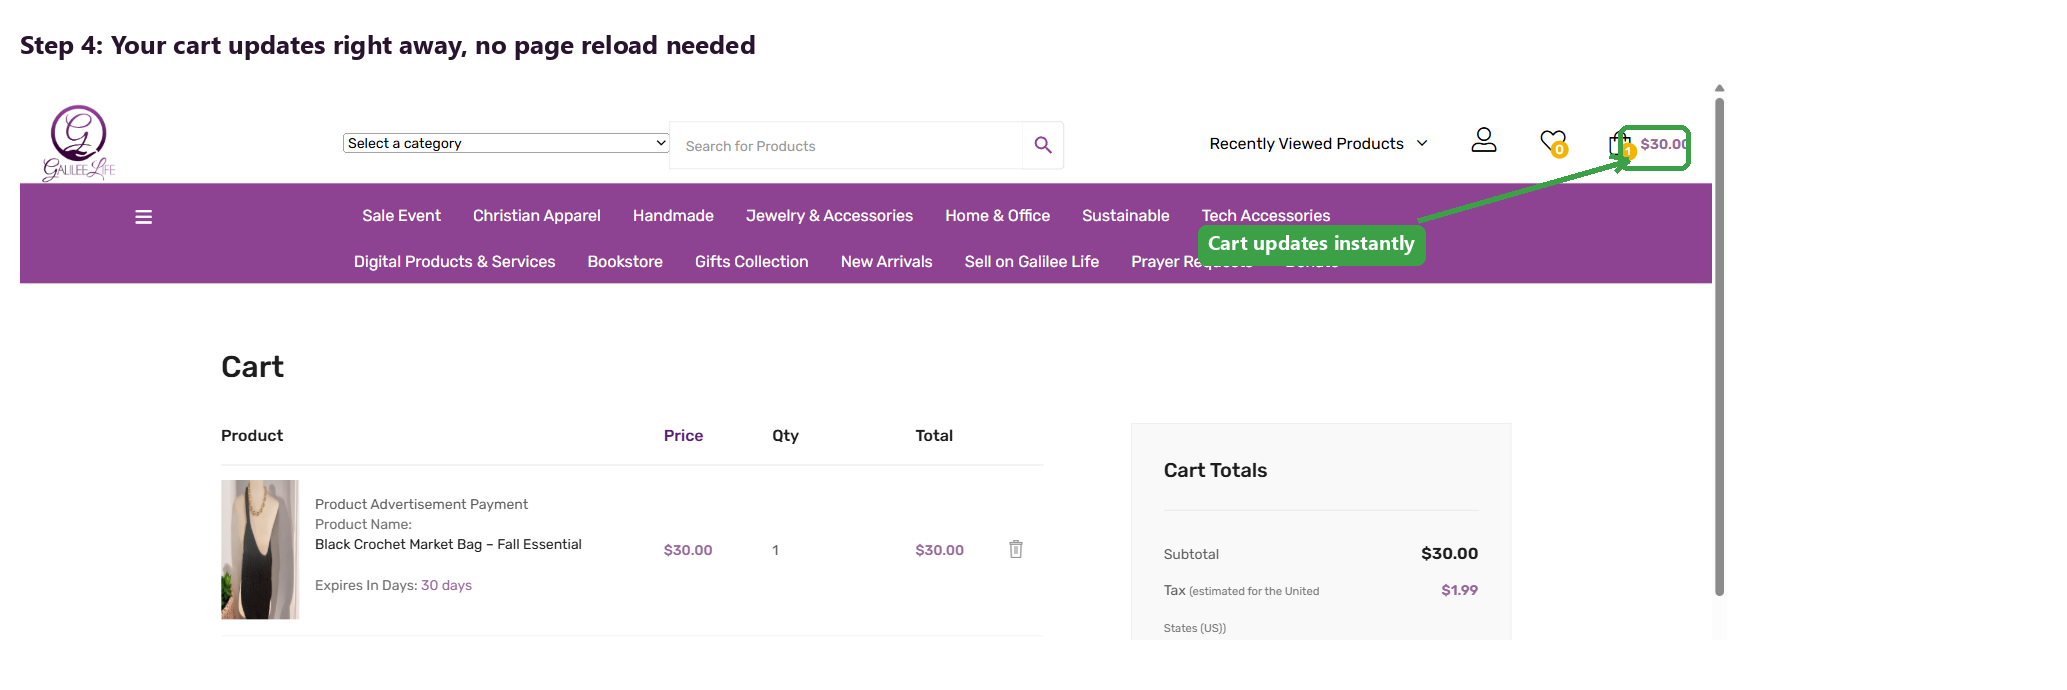
Once payment is complete, your product’s advertisement starts right away and runs for the length you chose. You can advertise a different product again at any time once the current one expires.
11. Wholesale Selling
What it is: A way to sell a product at a lower, bulk price to approved wholesale customers, on top of your regular retail price. You set the wholesale price and the smallest quantity a buyer has to order to get it. Regular shoppers never see the wholesale price, only your normal one.
Who buys at your wholesale price: Only shoppers the marketplace has approved as wholesale customers. A shopper applies through their own account, and approval isn’t automatic, so you don’t need to screen buyers yourself.
Step 1: Turn wholesale on for a product
- Go to Products in the left menu and open the product you want to sell wholesale.
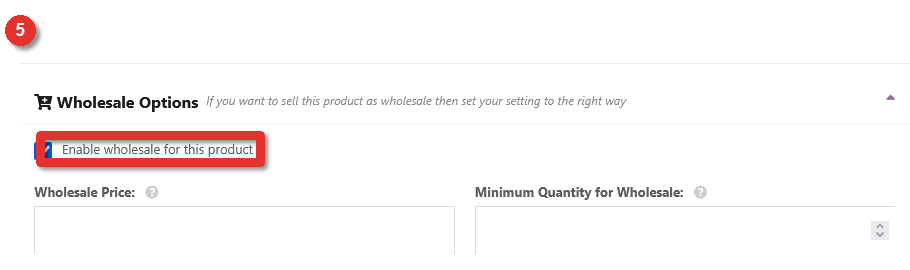
- Scroll down to the Wholesale Options section, below SEO and above Other Options.
- Check Enable wholesale for this product.

This checkbox used to look faint and hard to spot on this screen. We fixed it. Reload the page if it still looks faded, since your browser is showing an older cached version.

Step 2: Set your wholesale price and minimum quantity
Once you check the box, two new fields appear right below it.
- Wholesale Price: the price per unit a wholesale customer pays, instead of your regular price.
- Minimum Quantity for Wholesale: the smallest number of units a wholesale customer has to buy in one order to get this price.
- Scroll down and click Save Product.
Your product now shows its regular price to every shopper and the wholesale price only to a shopper the marketplace has approved as a wholesale customer, once they order at least the minimum quantity you set.
Step 3: What shoppers see
You don’t have to do anything for this step. Once wholesale is on for a product, every shopper who isn’t an approved wholesale buyer yet sees a small Unlock wholesale price button under your normal price, on your store page, in the shop, and on the product itself. Your normal price stays where it is, so everyday shoppers buy the way they always have. If you set a minimum quantity, it shows next to the button, for example “from 25 pieces”.

A shopper who taps the button is asked to sign in, and then the request goes to the marketplace for approval. While it waits, the button turns into a short note on every wholesale product they look at.

Once the marketplace approves them, the note goes away and they see your wholesale price and minimum quantity in its place. Approving wholesale customers happens on the admin side, not in your vendor dashboard, so if a shopper asks you about their request, point them to the marketplace.
12. Hide Your Address and Phone Number
What it is: Two checkboxes in your store settings. One hides your phone number from shoppers, the other hides your address and the map. Your details stay saved in your account, and the marketplace team still has them for orders and support. Only what a shopper sees changes: your store page, the store list, and your product pages.
Why you’d want it: Many sellers work from home. Without these boxes ticked, the address you entered when you signed up shows on your store page for anyone to read.
Step 1: Open your store settings
- Go to Settings in the left menu, then Store.
- Scroll down past the address and company fields until you see the row labeled Privacy.
Step 2: Tick the boxes you want
- Tick Hide my address and map from customers to take your address off your store page.
- Tick Hide my phone number from customers too if you’d rather shoppers reach you through the site’s own contact form instead of by phone.

- Scroll to the bottom and click Update Settings.
Your store page updates right away. You’ll still see your own address and phone while you’re signed in, since the change only applies to what shoppers see, so don’t be surprised when you check your page yourself.
If you’d rather not touch this yourself, tell the marketplace admin and they’ll tick it for you.